Most people don’t really need a ton of ability to forward bend in their daily life. However, if you want to be able to do fun gymnastics stuff, you need a good deal of compression in this pike shape. This is something I’ve struggled with for many years and the best way I have found to improve is to use bands and weight. I really enjoy this variation. I hope you do too. Wrap a band around a post and walk away and bend forward. Lean away from the post and try to contract your quads and abs and pull your face gently to your shins. Breathe slowly and deeply and stay here for a couple of minutes.
Here are the rules for the 30-Day Stretch Fucking Harder Challenge. Each day do the deep stretch, post it on Instagram and tag some friends to do it with you. Post your stretch with the tags: #stretchfuckingharder #supplepandas #30daypandachallenge Tag me @coachpanda. Come back here to my website or vimeo channel to see more details on each stretch and modifications and scaling options. Try to stay in each stretch for at least 2 minutes per stretch per side. Remember to breathe slowly and deeply and start gradually and move deeper over time. Back off if it hurts.
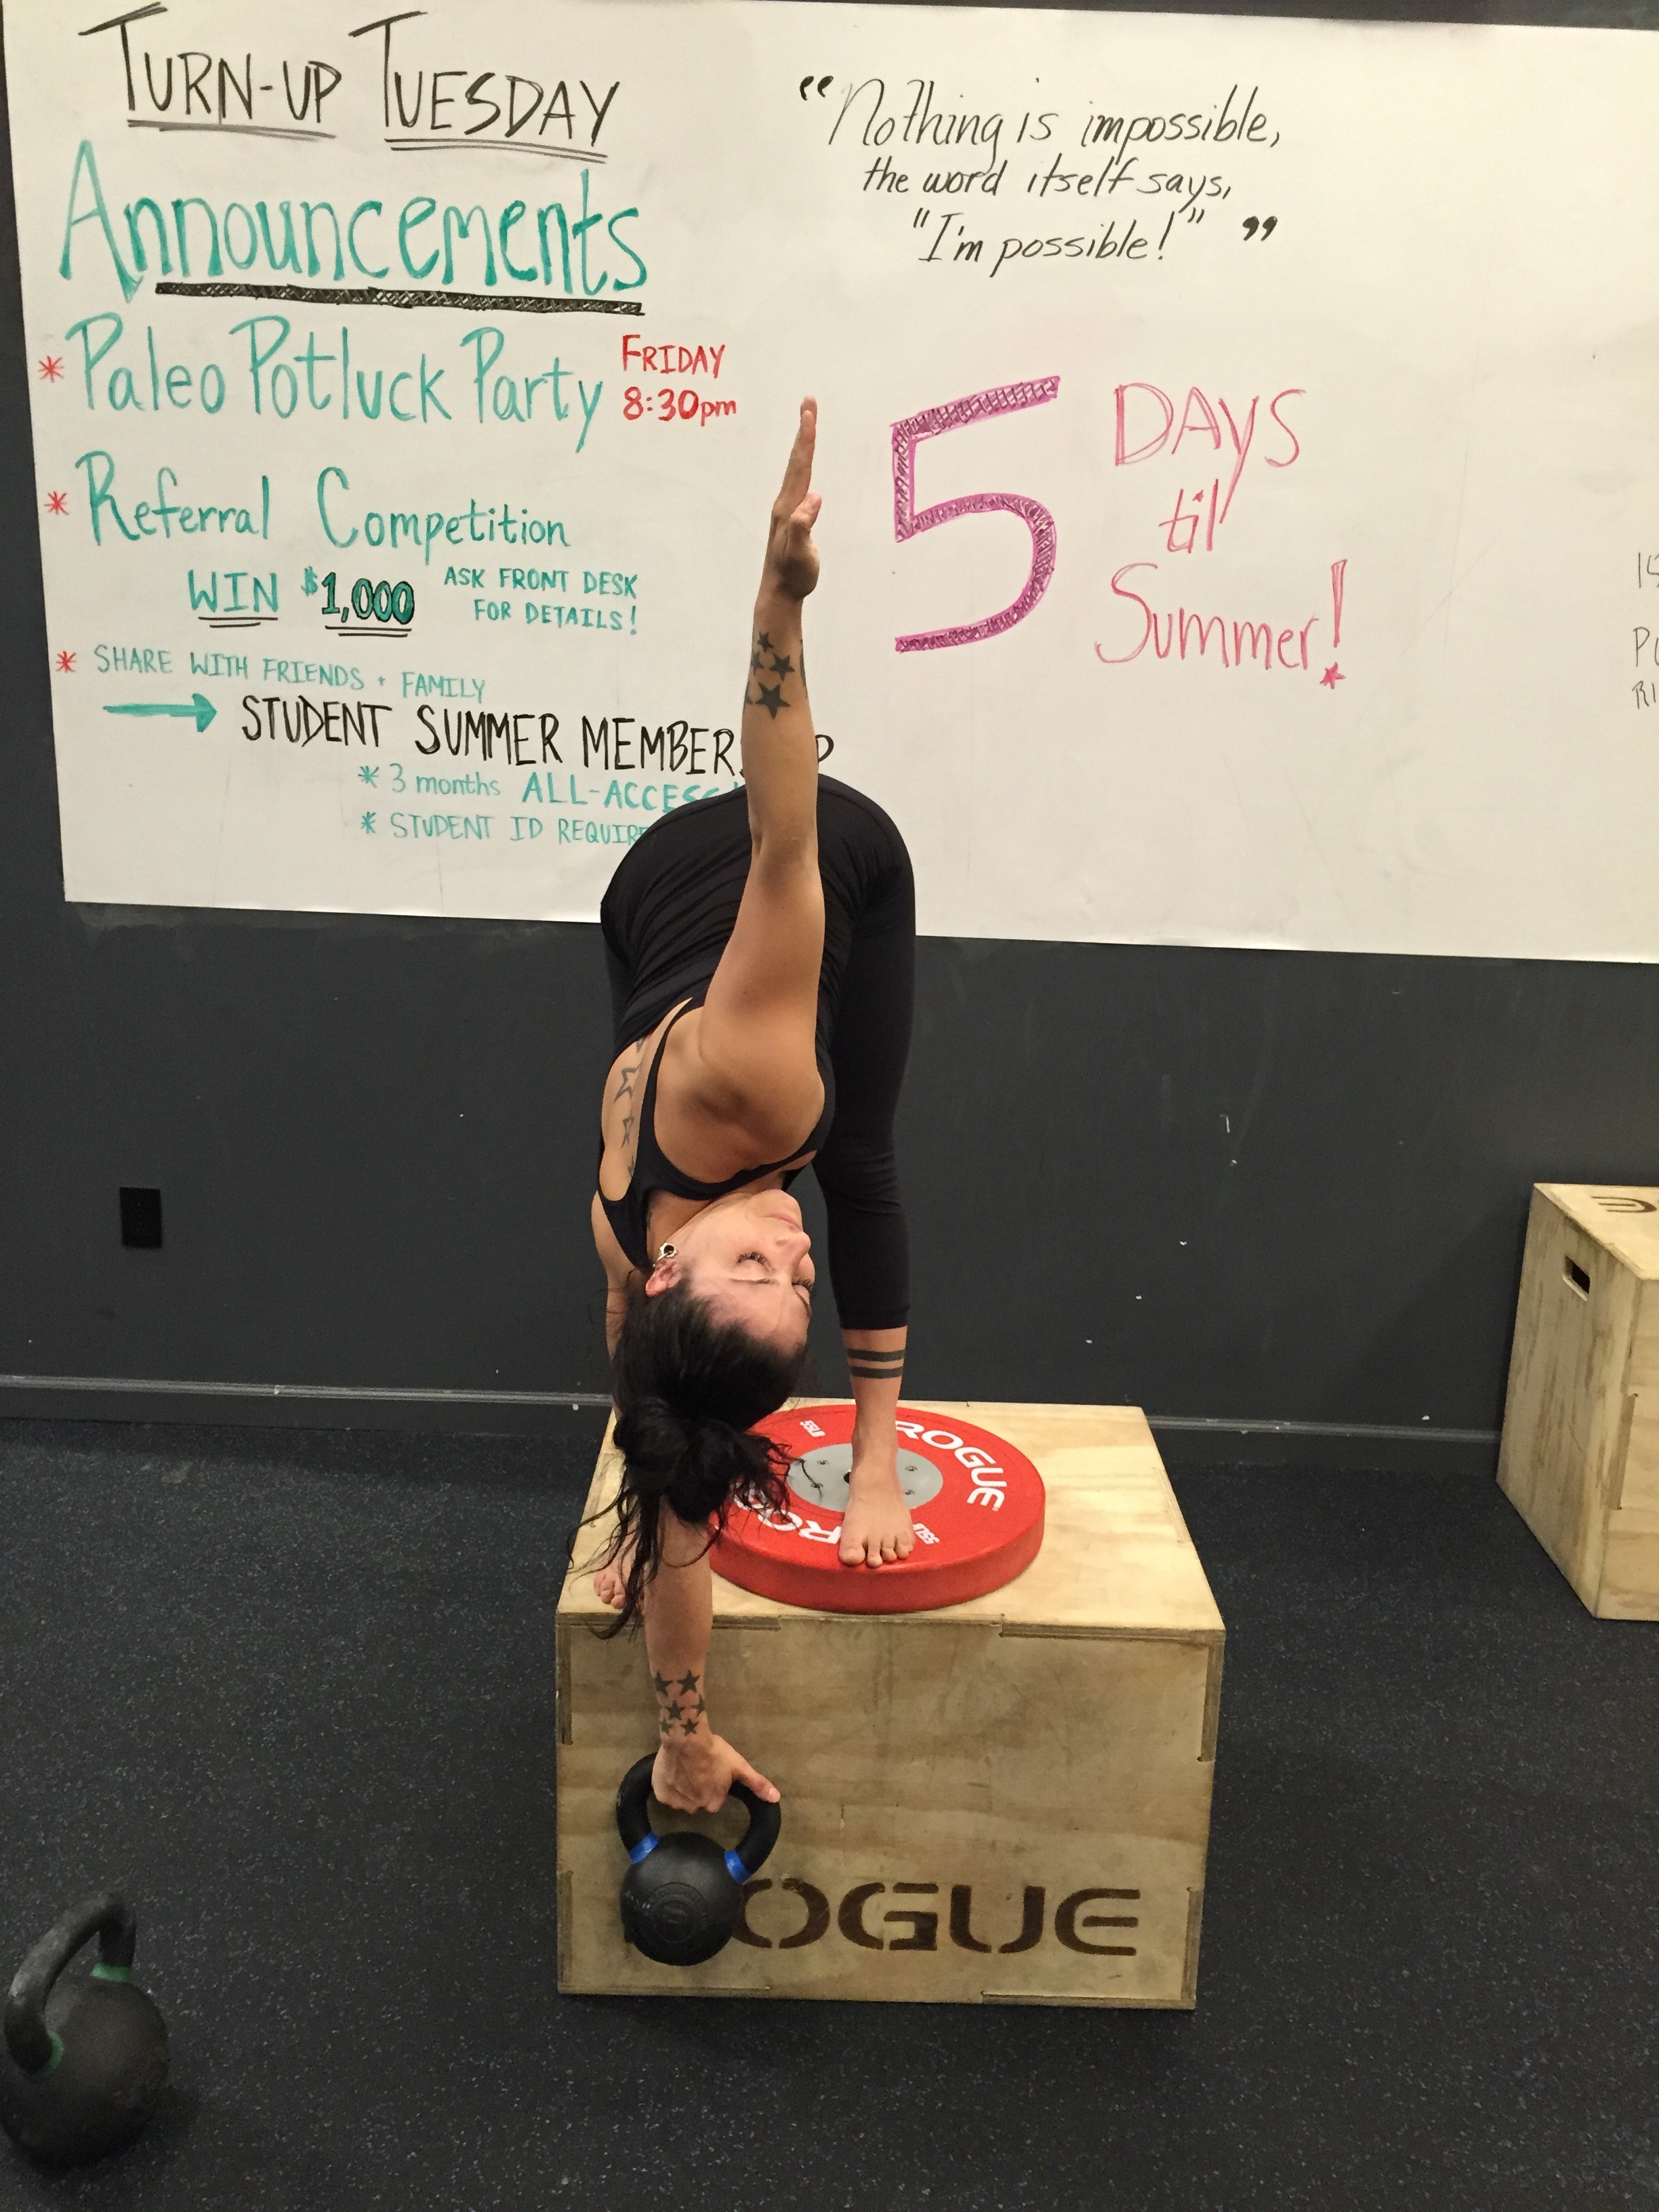
My instagram feed went nuts about a year ago because I posted some pictures of this stretch. To be clear, I didn’t invent this but a lot of people associate me with it and sometimes tag me in pics and call this the “panda stretch.” I’m glad because this stretch is amazing. It is usually called the Jefferson Curl or simply a weighted forward bend. Doing this regularly helps me get into better positions in gymnastics and feels good.
If you’re new to this, then just do the basic, two-legged version. You can also do this with bent knees if your hamstrings are really tight. If your feeling up for a challenge, do this single-leg variation with your toes up on a yoga mat or small bumper plate.
Here are the rules for the 30-Day Stretch Fucking Harder Challenge. Each day do the deep stretch, post it on Instagram and tag some friends to do it with you. Post your stretch with the tags: #stretchfuckingharder #supplepandas #30daypandachallenge Tag me @coachpanda. Come back here to my website or vimeo channel to see more details on each stretch and modifications and scaling options. Try to stay in each stretch for at least 2 minutes per stretch per side. Remember to breathe slowly and deeply and start gradually and move deeper over time. Back off if it hurts.
Here is an advanced set of hamstring stretches that you should definitely respect. These are aggressive and awesome, but you should be aware of the contra-indications. Do NOT do this if you suffer from any of the following: herniated discs, hyper-mobility (including double jointedness, “trick” joints, Ehlers-Danlos syndrome, or a previous history of dislocating joints), low blood pressure, or are pregnant. Seriously, don’t mess with this stuff.
This series of stretches is for those of you that suffer from really tight hamstrings and are generally well-muscled. I wouldn’t recommend it to most people that don’t lift heavy weights regularly. Furthermore, I would NOT do this prior to a workout as static stretching like this can weaken the posterior chain in the short term. Do this when your muscles are warm after a work out.
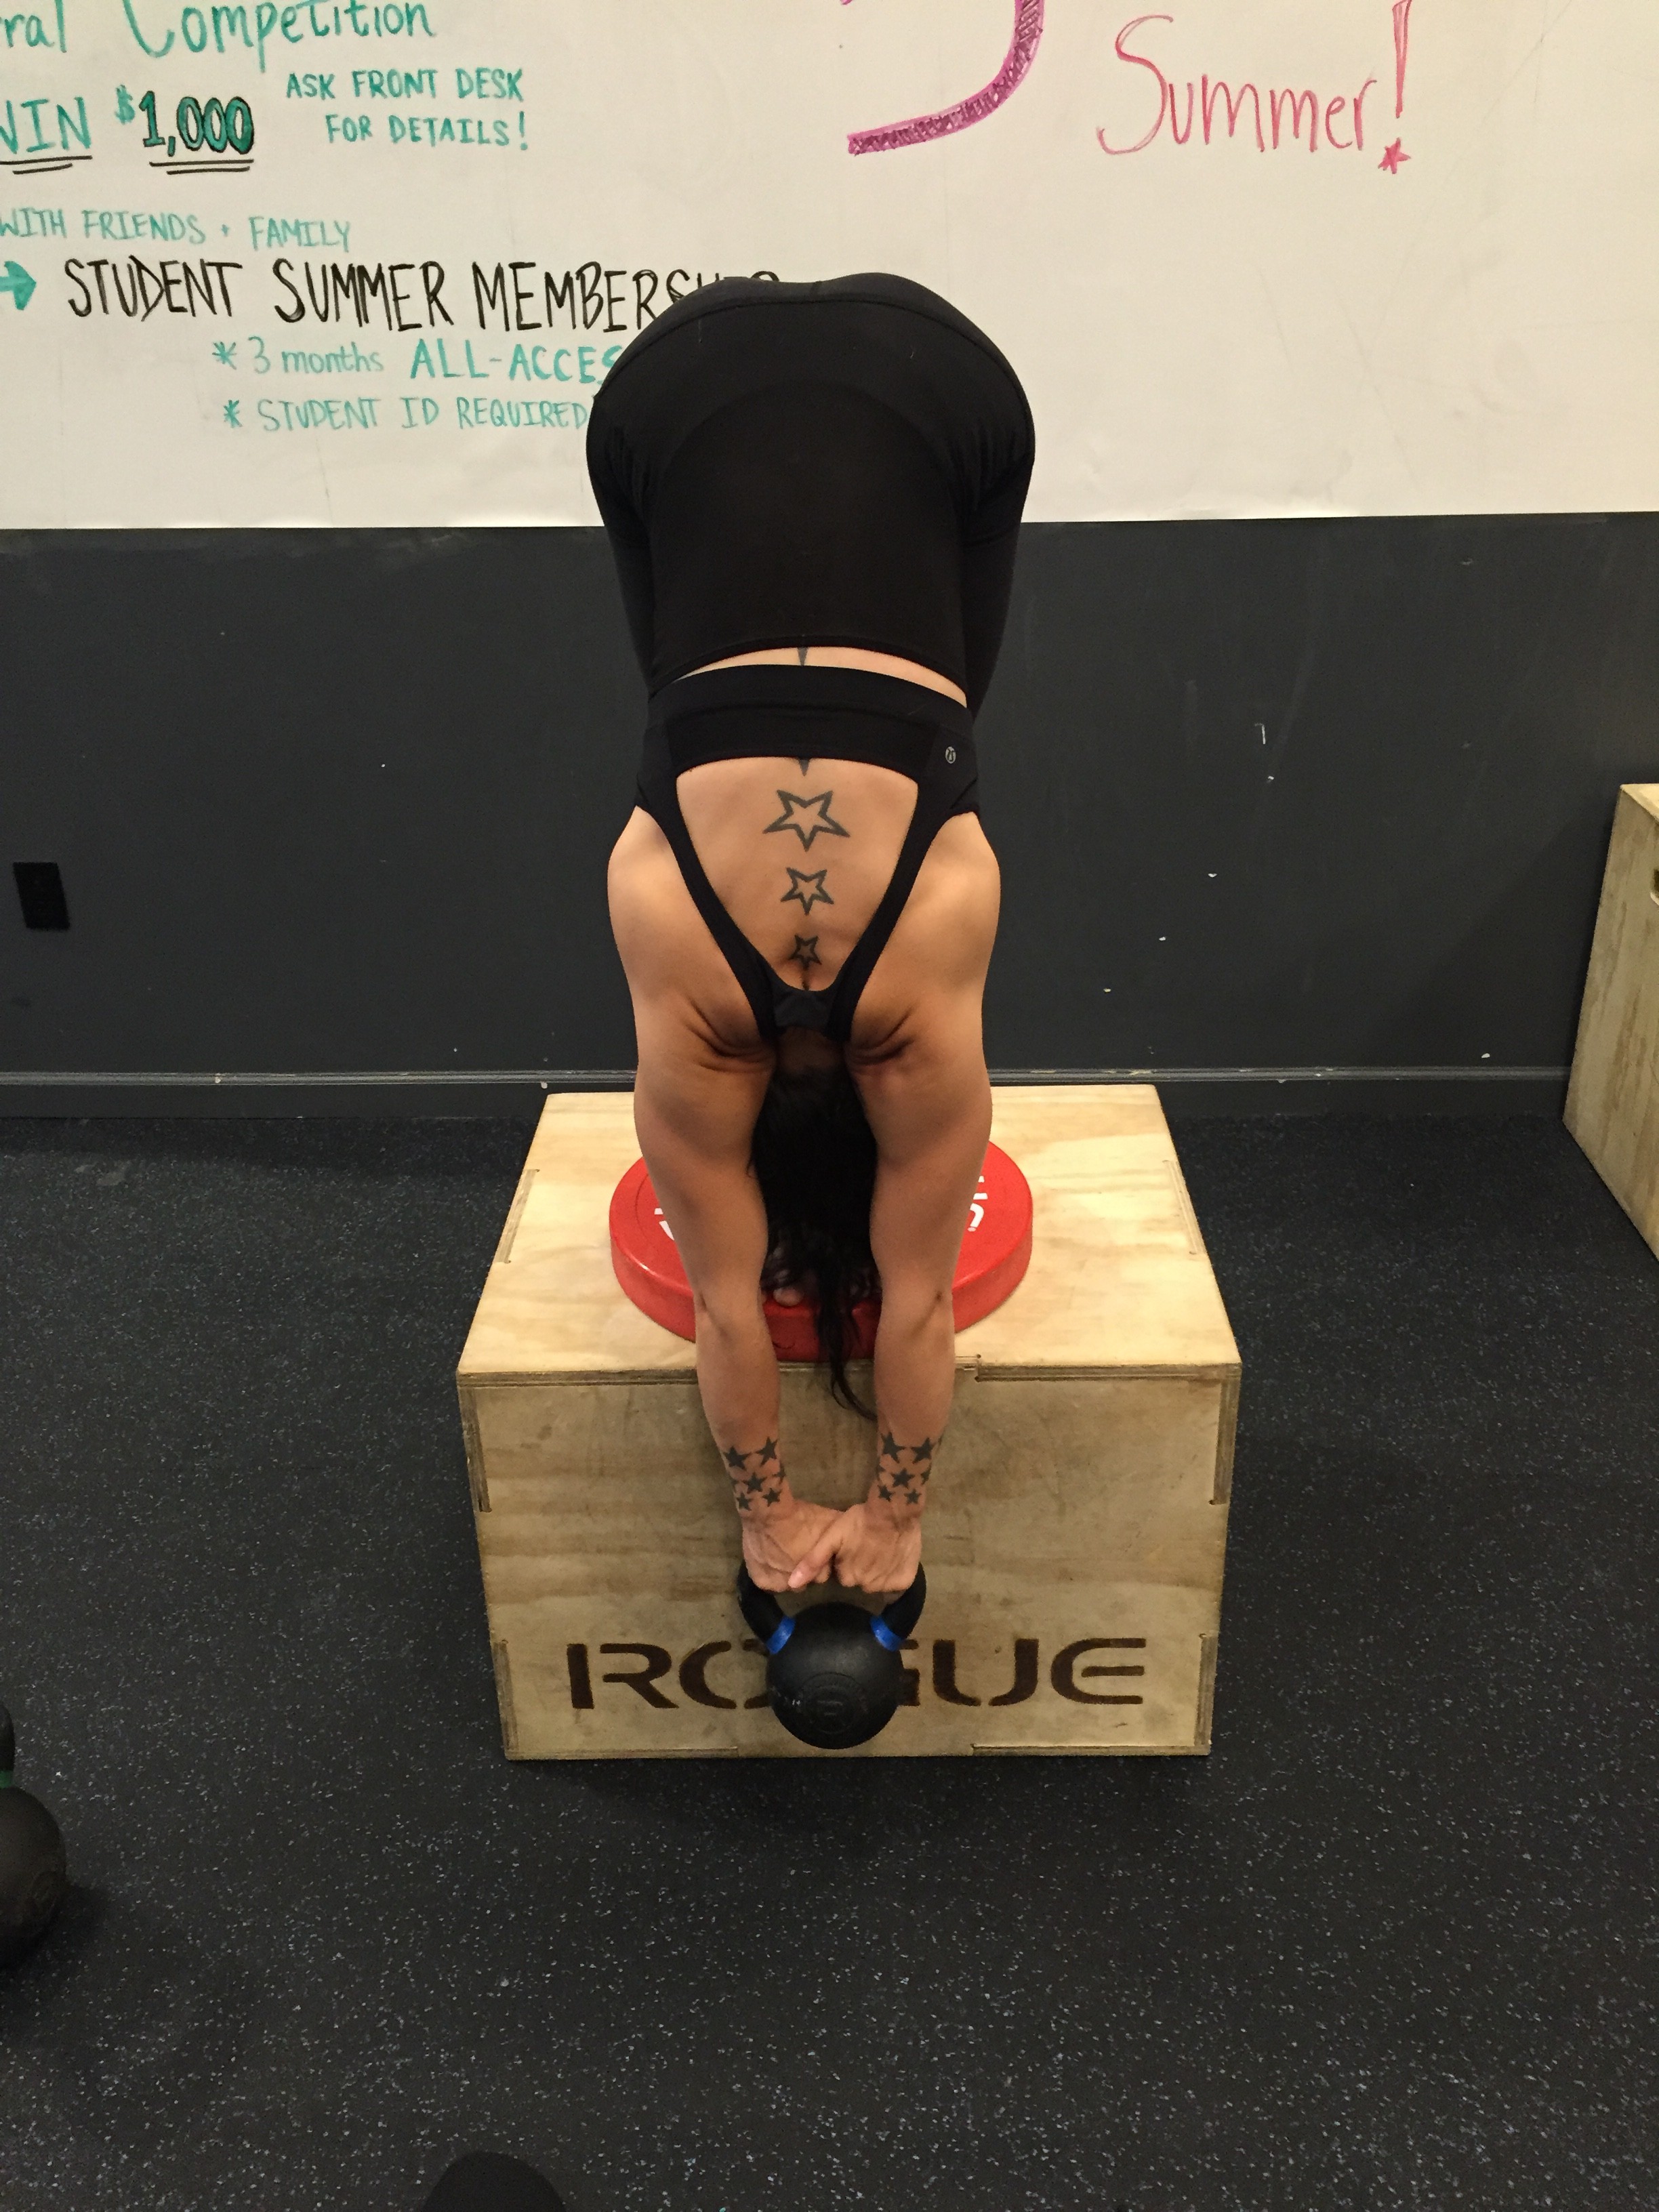
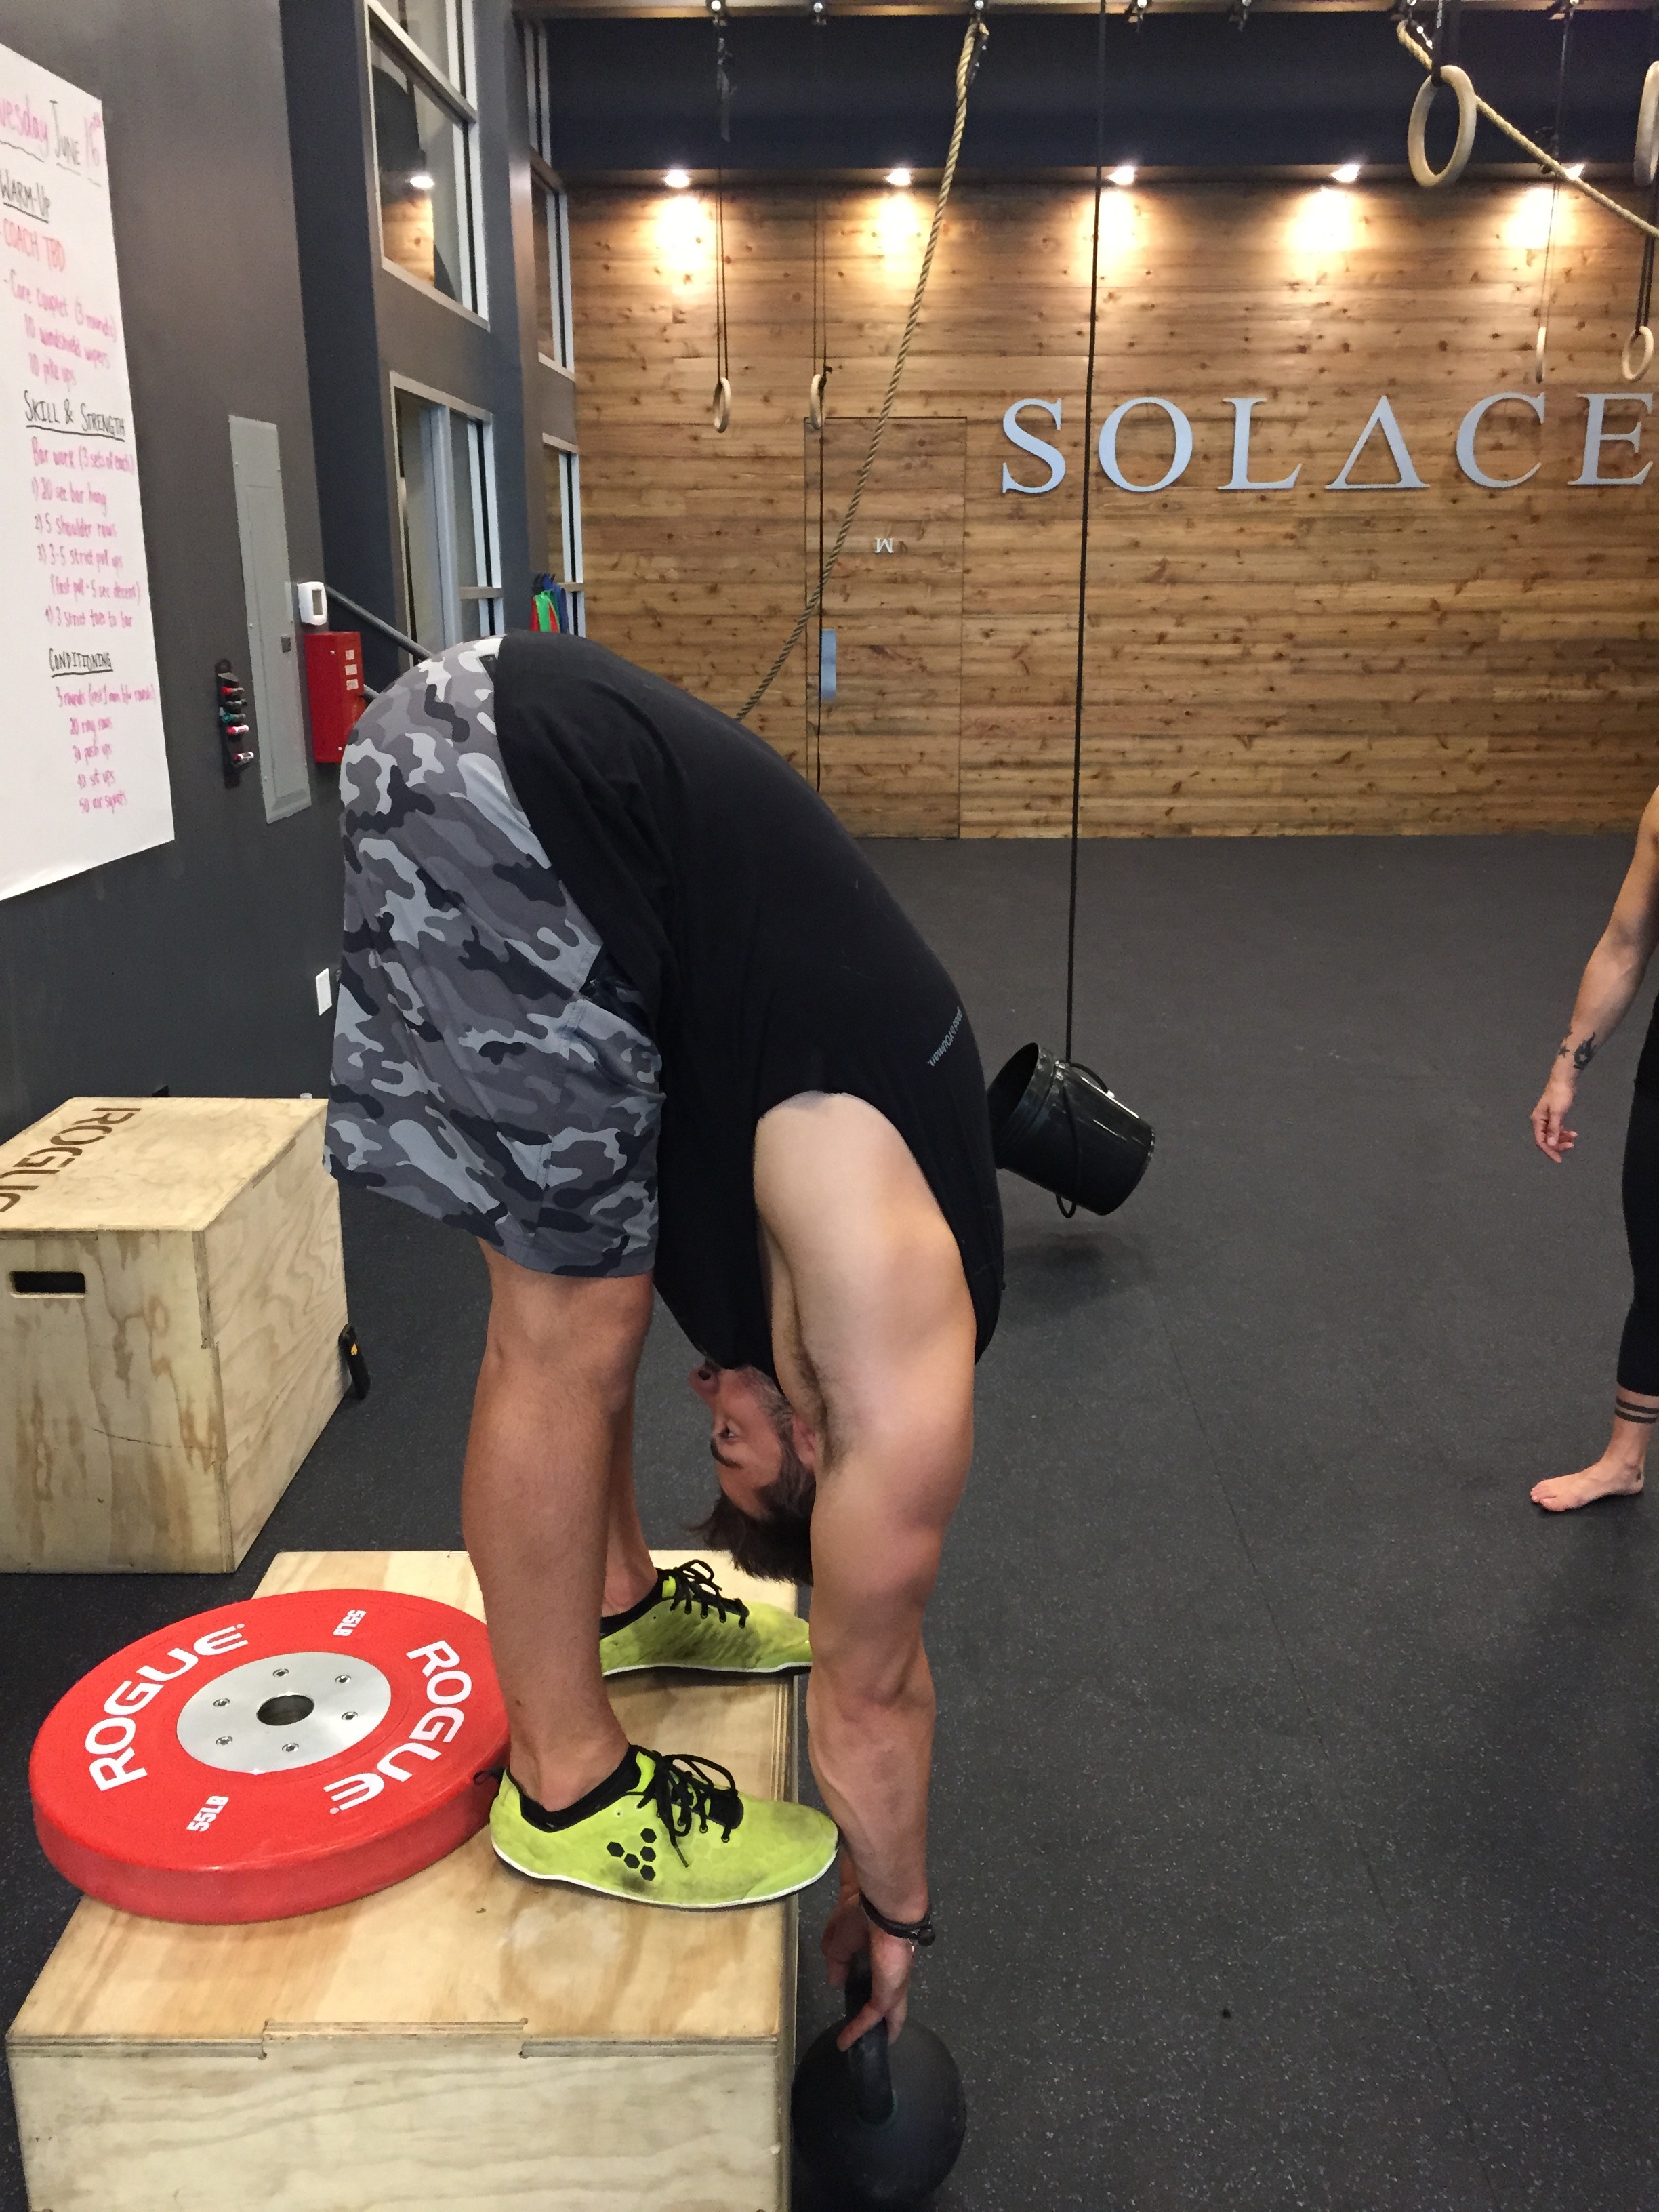
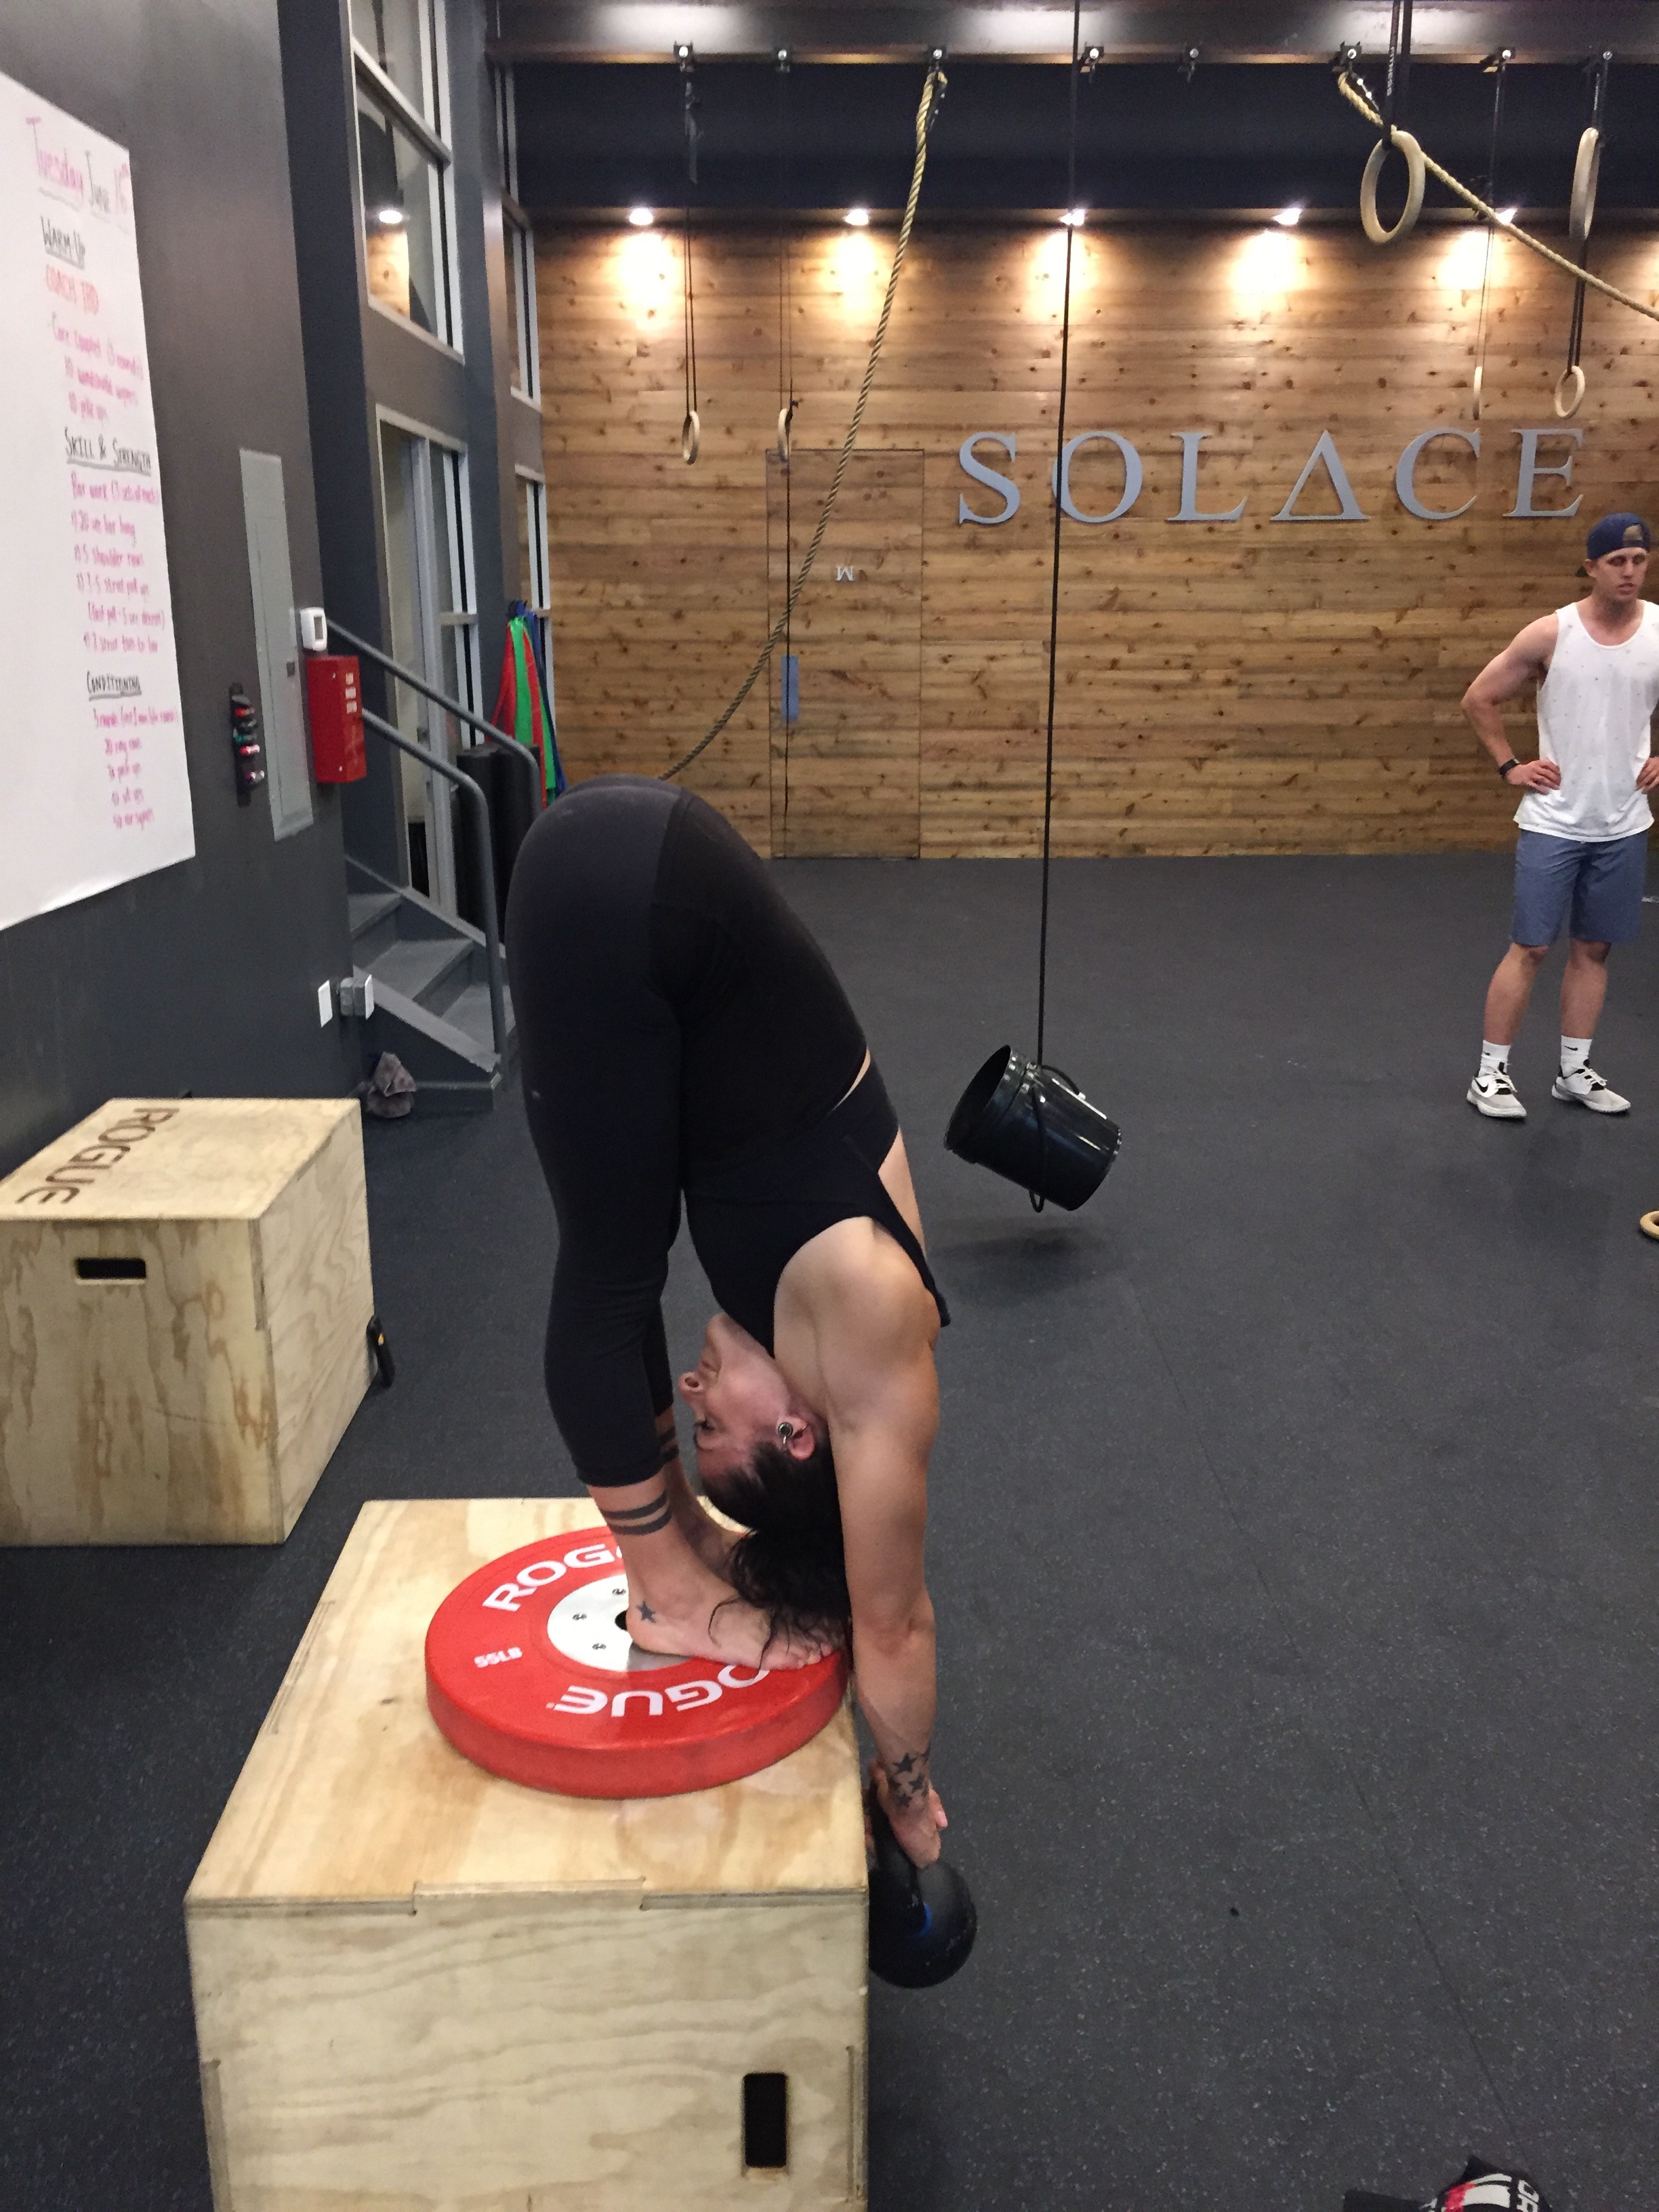
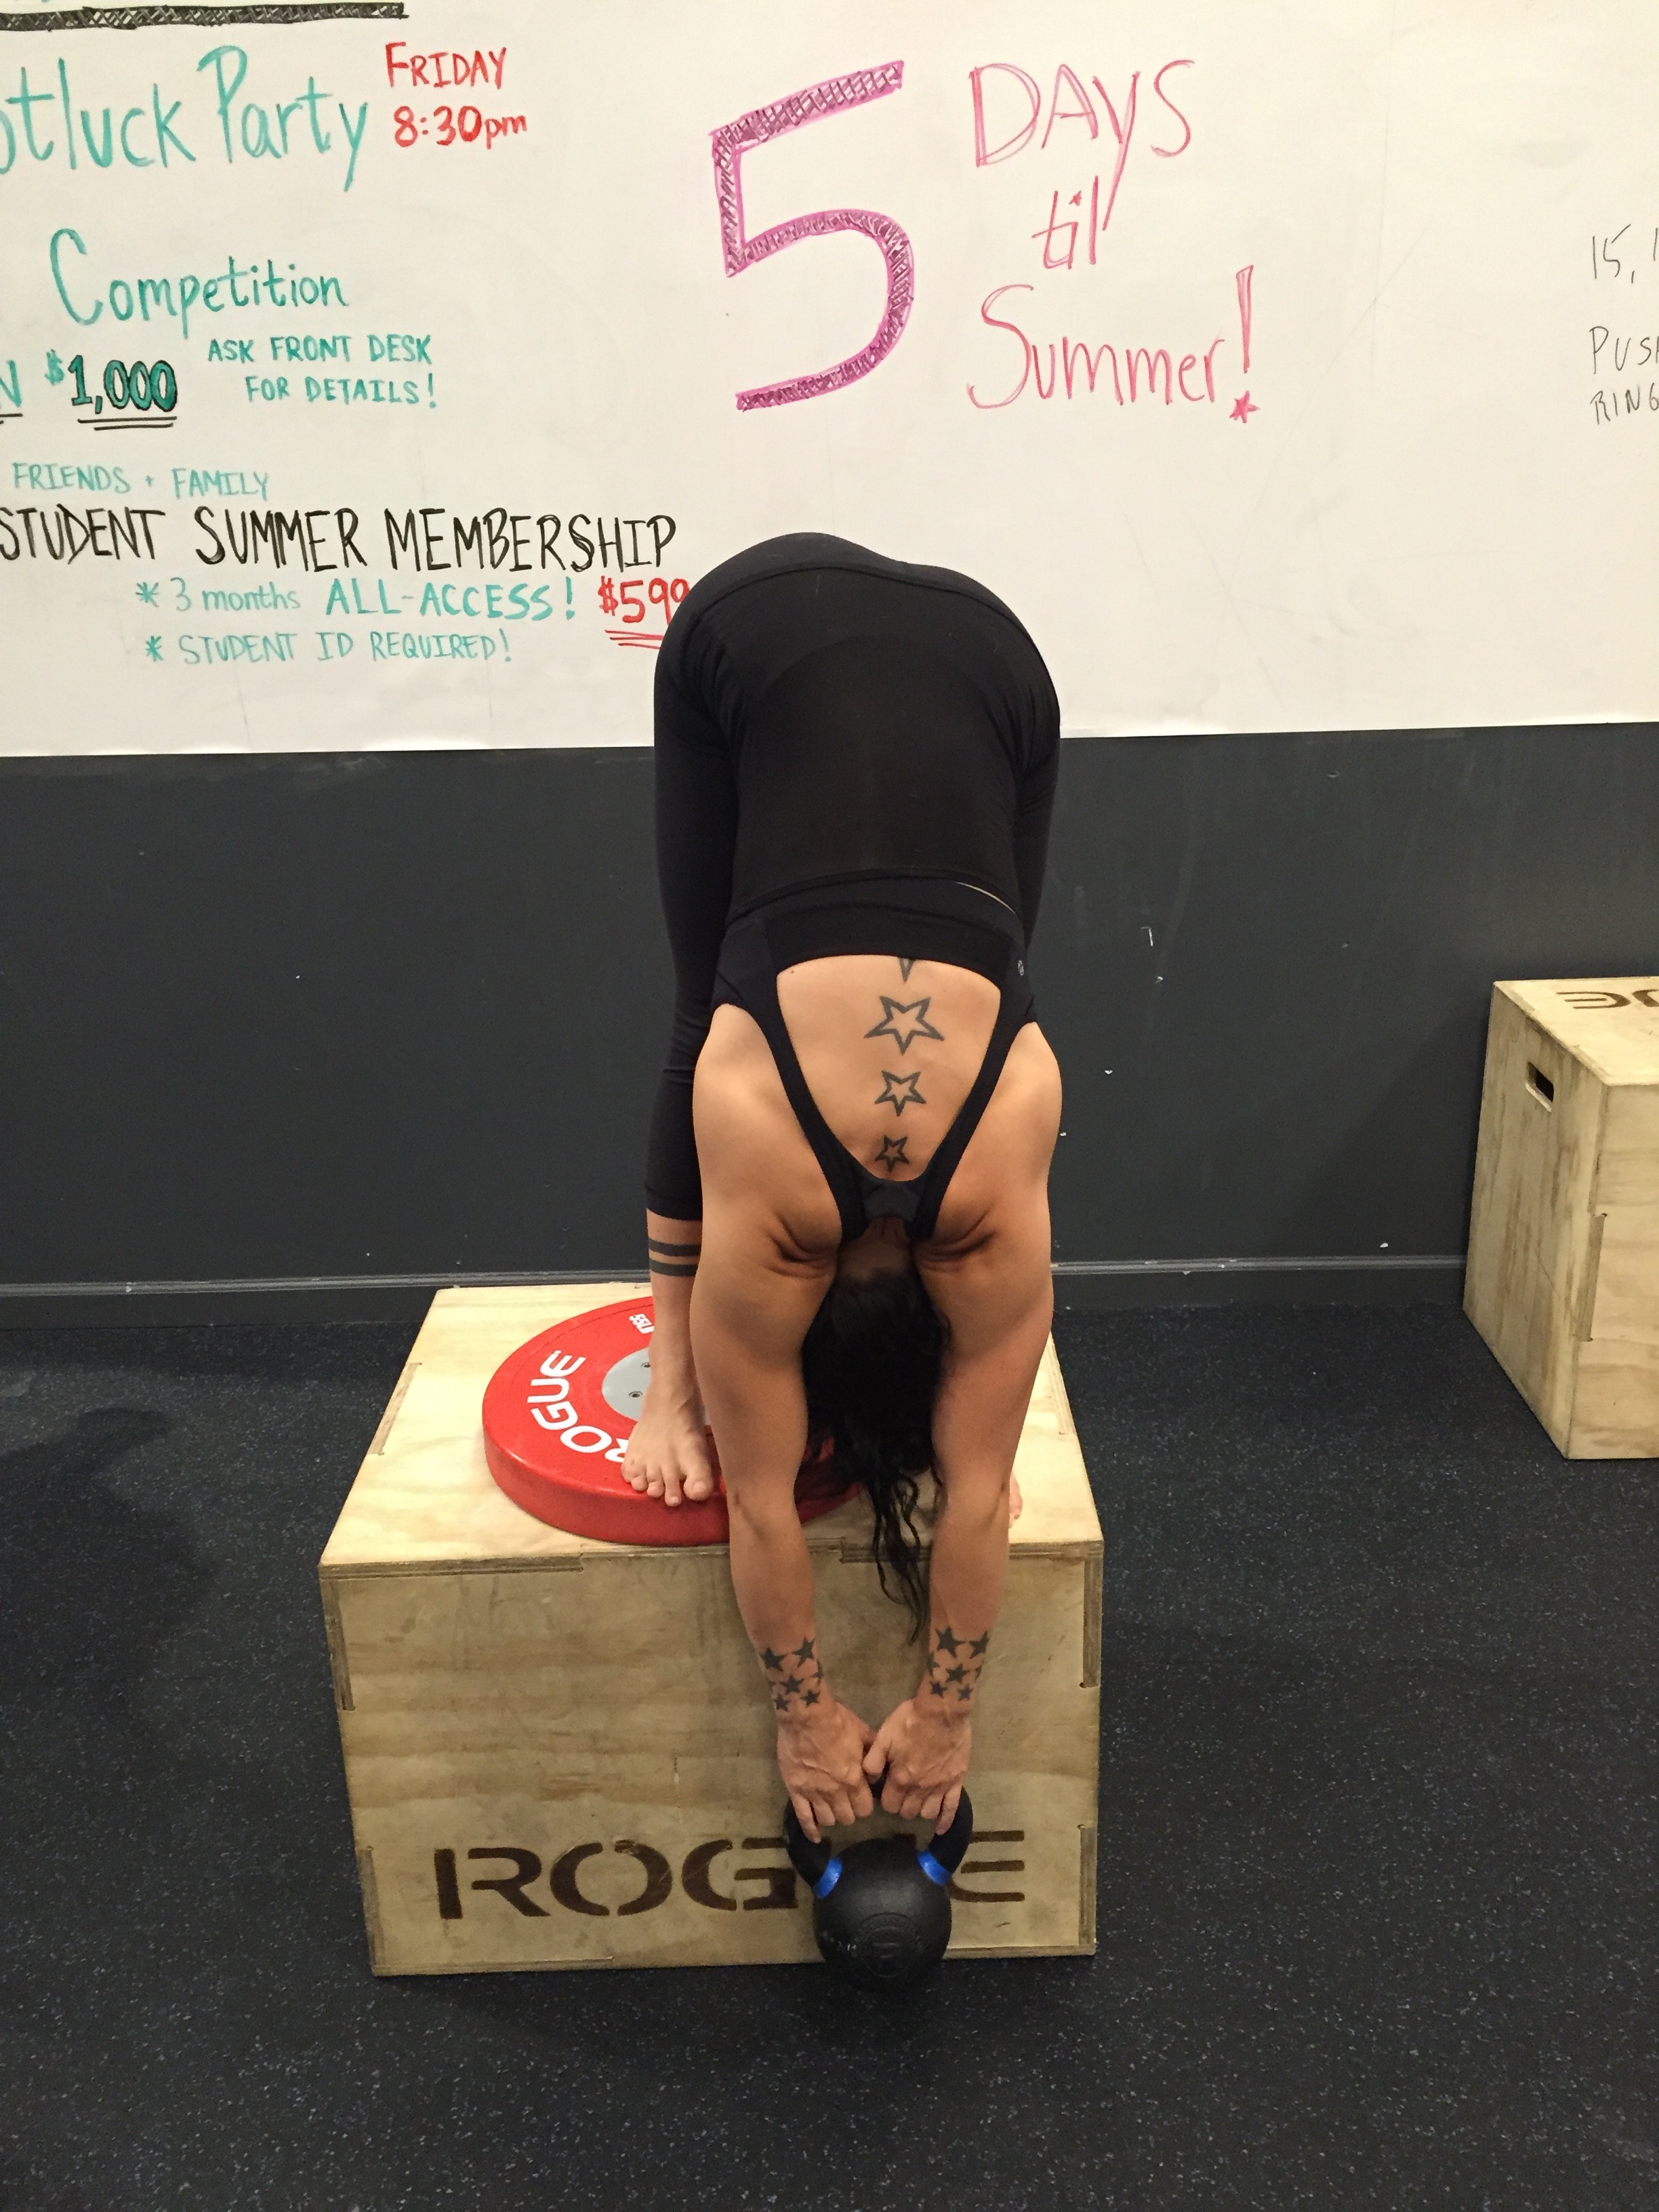
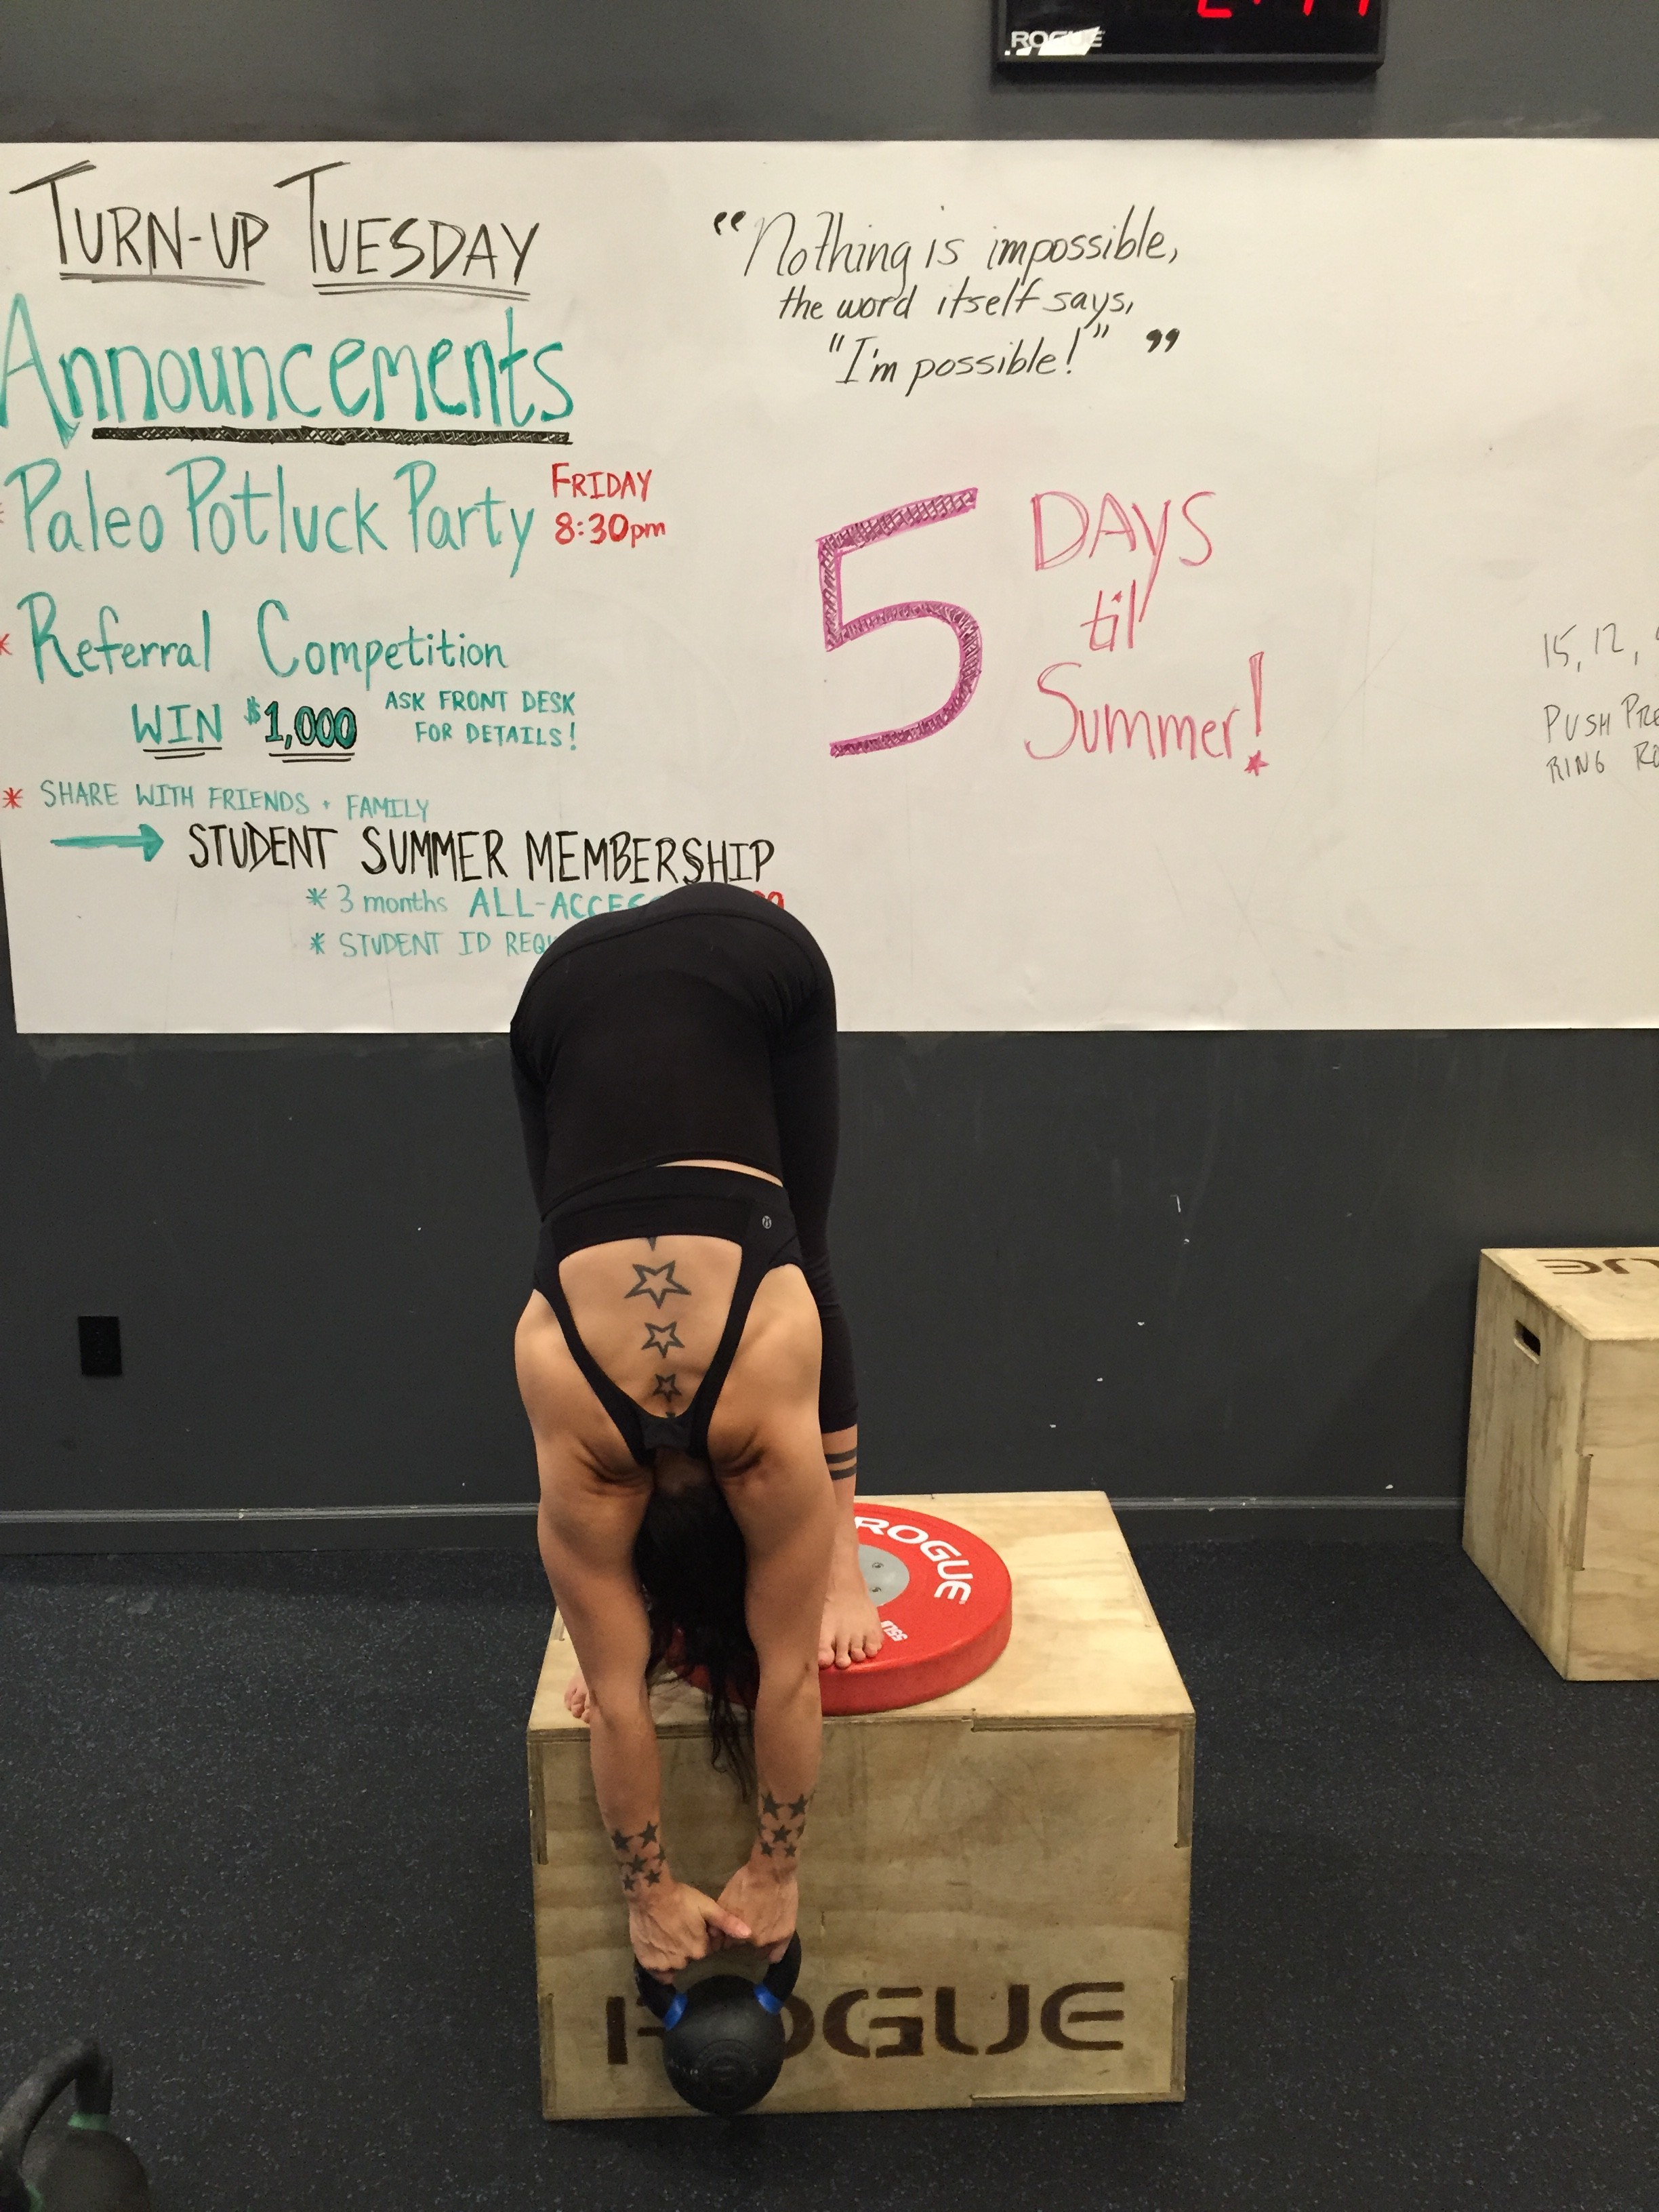
This is a series of weighted forward bends. In yoga the pose would be called weighted uttanasana. This article will explain how to do it safely and show you some exciting variations that will stretch your hamstrings like never before. Here is what you need: a box or a bench to stand on, a very firm yoga block or one or two large weight plates (I have a 55lb plate in the pictures), and a relatively heavy weight (10-20kg for women and 20-32kg for men).
As a general rule, I would do all of the following exercises unweighted at first to get a feel for them and to make sure the equipment is stable. Once you feel comfortable with the movements, add weight. There is a sweet spot when it comes to how much weight you should use. These are passive stretches and you should be relaxed and breathing slowly and deeply throughout. You should spend a minimum of 30 seconds in each stretch and gradually work your way up to 2 minutes. A weight that feels light at first will feel a lot heavier at the end of 2 minutes. A weight that is too heavy will cause you to be tense and you will not be able to stretch as effectively. I recommend an unloaded barbell or a kettlebell to do these exercises. The barbell is nice because you can load it very gradually. However, the barbell takes up a lot of room and can roll off your box if you try to rest it there. A kettlebell takes up less room and doesn’t roll away when you leave it unguarded. However, you cannot adjust the weight of the kettlebell, so you’ll probably need to have a couple to choose from to find the correct weight.
The first exercise is called a “Jefferson Curl” or a “Weighted Roll Up.” Stand up tall with your feet together. Slowly roll your chin down into your chest, then roll your shoulders forward and start to round over one vertebra at a time until you hands are down by your feet and your head is in looking at your knees. Hold at the bottom for a few seconds and then slowly come up by tucking your tailbone under, stacking your spine up tall starting at the bottom until your shoulders and head come up last. Your hands should slide down and up your legs throughout the performance of this exercise. Most likely you’ve done this in some yoga class somewhere. Now stand on the edge of a box with your whole foot on the box but your toes very close to the edge. Hold the weight in front of you resting on the front of your thighs with your arms long and straight and relaxed. Perform the same exercise letting the weight slide down the front of your legs. Watch out for your toes and let the weight lower past the edge of the box as far as your flexibility will allow. Hold for a few seconds and then roll back up slowly. Perform 5 slow repetitions.
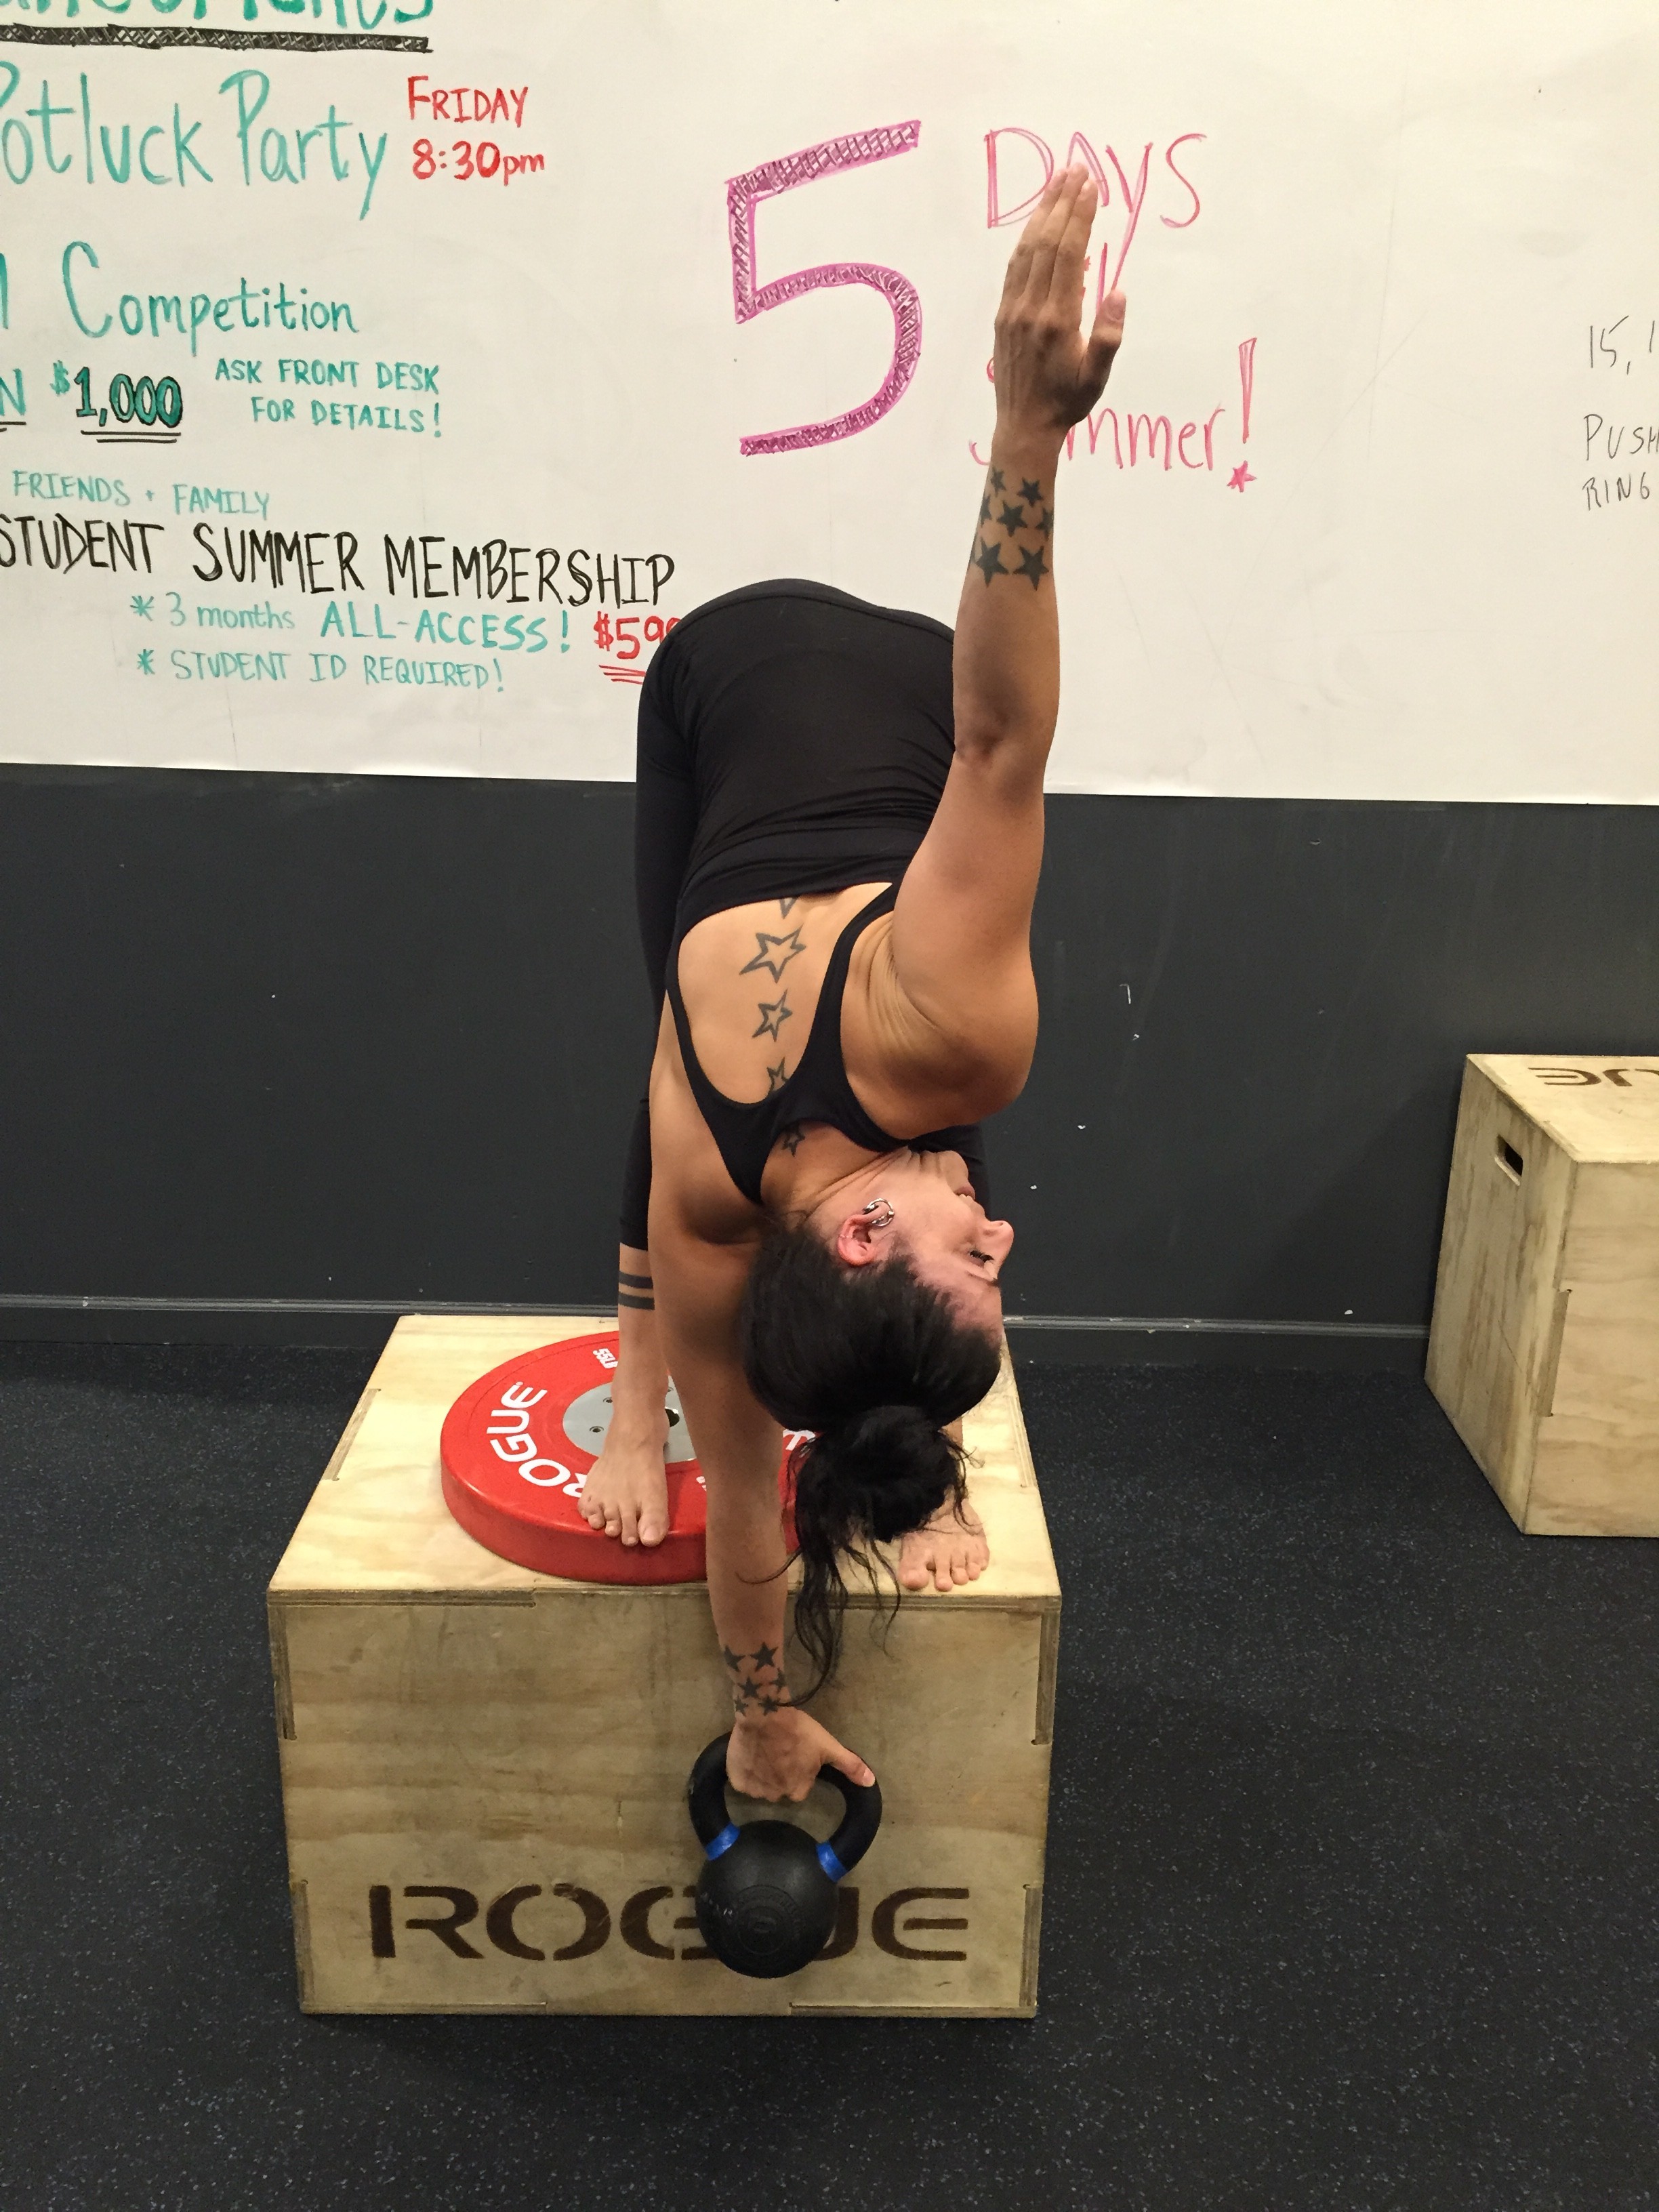
Weighted Uttanasana. Perform a Jefferson Curl but hold the bottom position now. Breathe long, slow, deep breathes. Five deep breaths is a good start. Eventually you want to put a stopwatch on the floor in front of you so you can check in. Gradually work your way up to 2 minutes. Most people cannot straighten their legs all the way. If you find it difficult to straighten the legs, bend your knees deeply, place your belly on your thighs, take a big inhale and as you exhale try to straighten your knees while keeping your belly on your thighs. Do not let the weight swing forward, keep the weight close to the box. It’s okay if it rests against the box (closer is better). Don’t rock your weight forward into the toes, be sure to keep your heels down. Be careful as you stand up, you might experience a head rush. I have my athletes work in pairs and spot each other. Try to do these somewhere that has mats and padded floors and somewhere that you can drop the weight if you suddenly feel lightheaded or off balance.
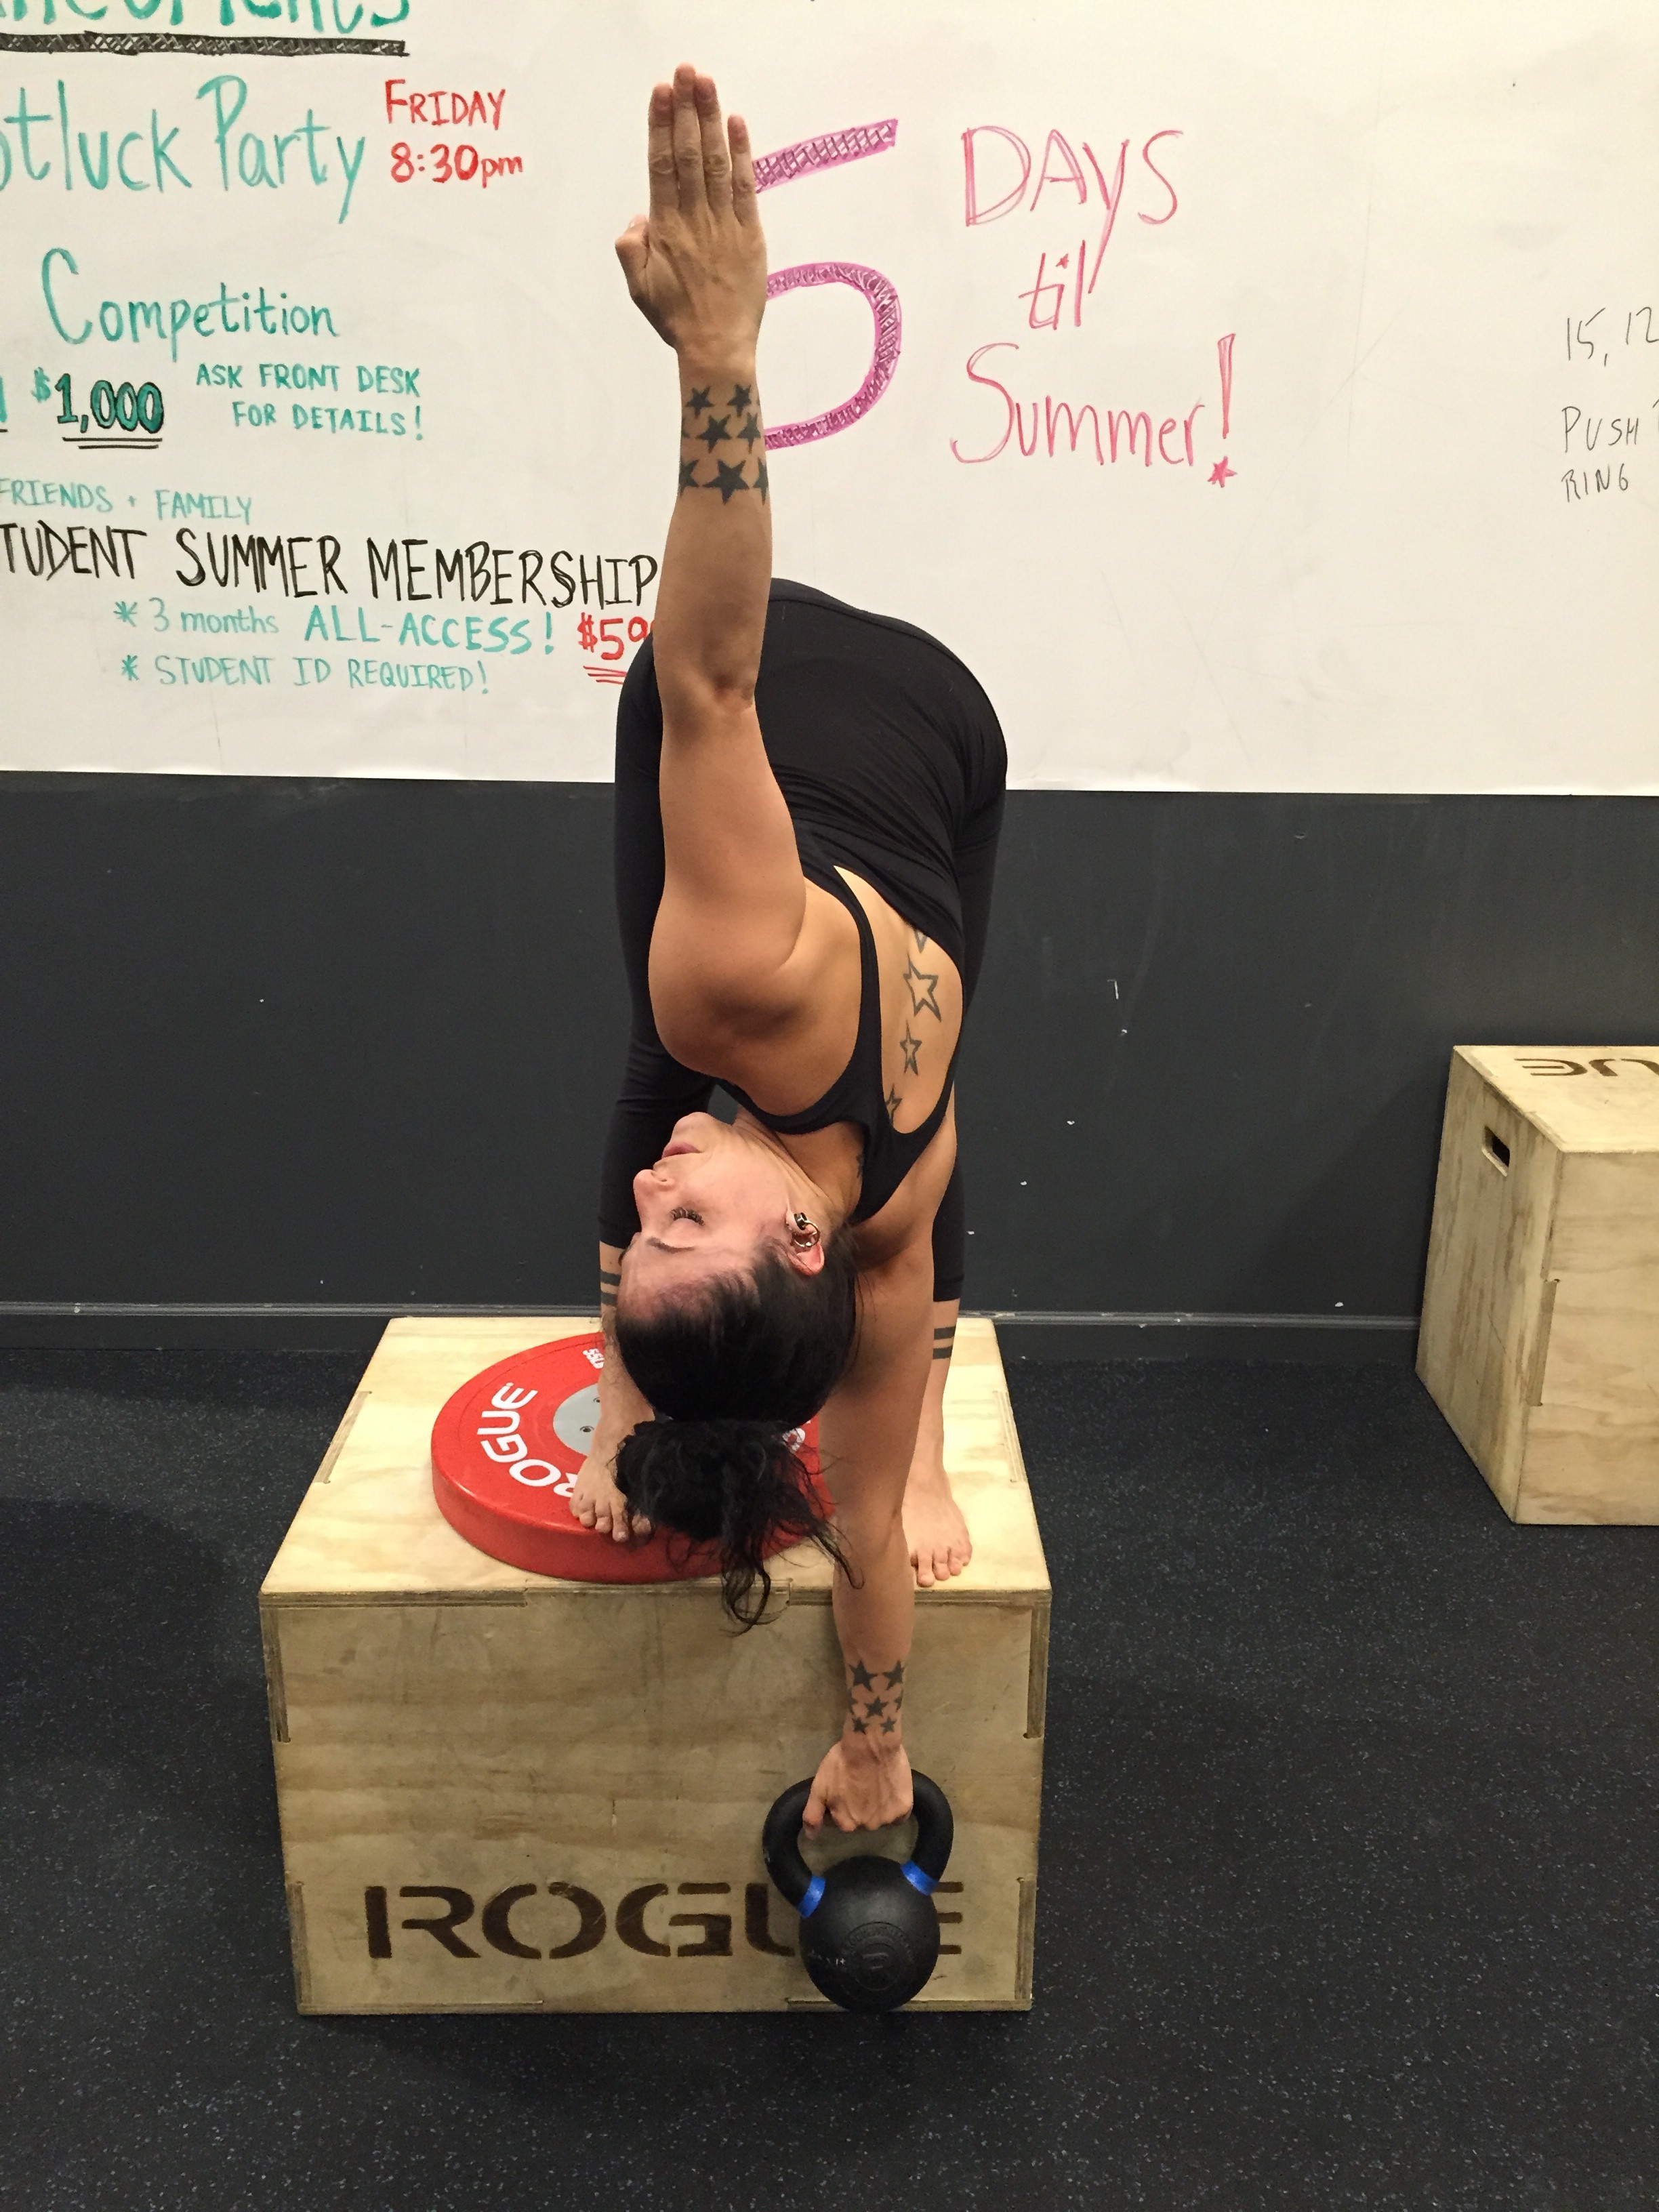
Weighted Asymmetrical Uttanasana. I learned asymmetrical uttanasana from Jill Miller. It is a great hamstring stretch but it also causes your femur to get pushed deeper into your hip socket (joint approximation) which feels amazing and helps your hips function better. I, of course, decided to take it to the next level and add weight to it because it makes it even more awesome. Place a yoga block (do not use a squishy foam block. Cork or wood only.) or weight plate on your box. The thickness should be between 2 to 4 inches. Place your feet parallel and symmetrically next to each other so both feet are pointed straight ahead and the toes line up with the edge of the box. Perform the Jefferson Curl with weight and hang down. Again breathe slowly and deeply. Initially, you will not want to put weight into the elevated foot, give it time. Slowly breathe and keep trying to shift your weight back and forth until you feel it is even between both feet. Bend and straighten the knees in time with your breath if you need to. The sensation of the forward bend changes entirely when you are asymmetrical. I suddenly feel it deep inside my hip joint and in my lower back (quadratus lumborum). Before switching sides test your squat or your deadlift setup (or both). You’ll notice the ability to squat deeper on the side that was elevated and notice that the elevated side feels much better in the deadlift setup and the hip will be further back. Repeat on the opposite side.
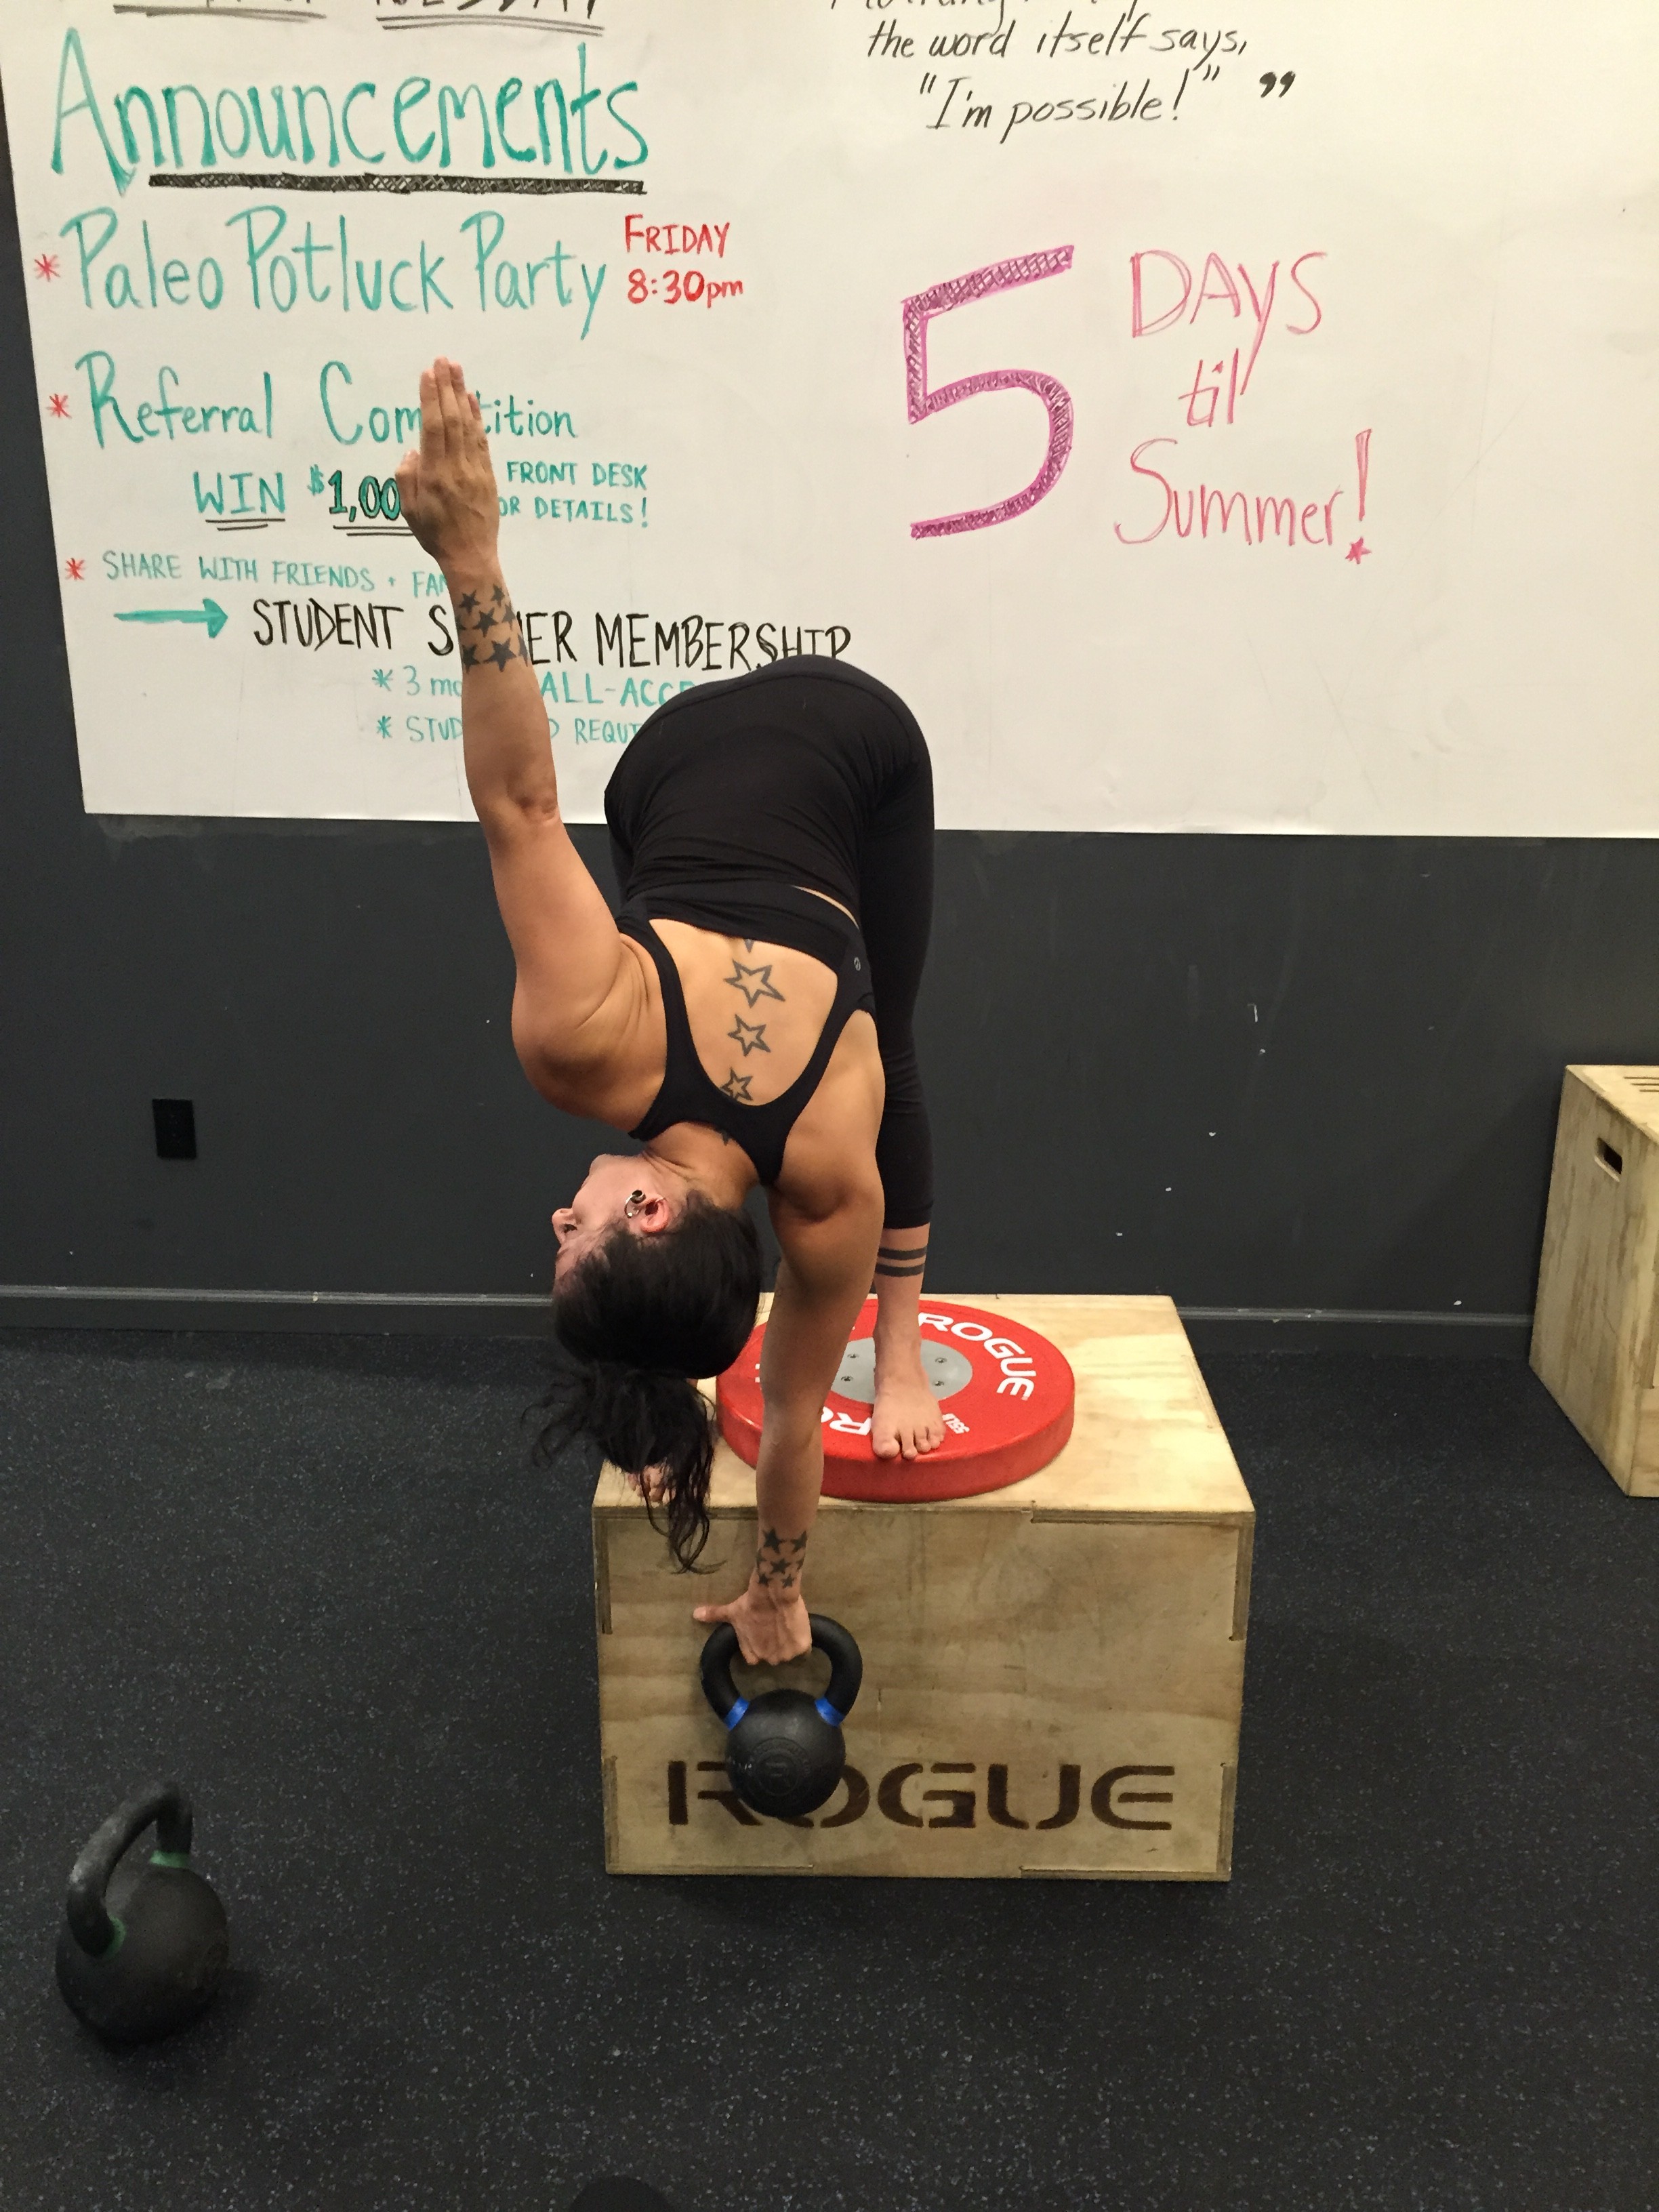
Weighted Asymmetrical Uttanasana with a Twist. Repeat the Asymmetrical Uttanasana now and while you’re in the bottom position let go of the kettlebell with one hand and reach that hand up to the ceiling, while turning your head and following it with your gaze. Hold this position and breathe and try to broaden across the front of your chest. After about a minute switch hands and twist in the opposite direction. One side will feel much more difficult because of the asymmetry. That’s okay. Keep breathing. Switch your feet and repeat the twists.
Take your time and try to accumulate about 5 to 10 minutes of total time playing with these variations. Bigger muscles require more work to stretch so use a little weight and apply pressure over time to make changes in those hamstrings. Consistency with these stretches will pay off.
Special thanks to my models: Samantha Star and Mike Aidala. Follow them on instagram @lithiumkitten@Mike.Aidala