Category Archives: Mobility

Back Pain?

Back pain? Spasms? Everything hurts? It’s the worst! Having a back injury can be really debilitating. If you go to the doctor and they don’t find anything wrong and just prescribe you painkillers, you might be thinking you’re all set. Unfortunately, painkillers are just a bandaid for the symptoms. You still have to strengthen and rehab your back.

There are many potential underlying causes of back pain. You may have a bulging disc. You may have a strained muscle. Your muscles could be weak. The muscles could be hypertonic. There could be a muscle imbalance. Something could be out of place. Whatever the case, there are some general things that you can do to improve your back problem. I’m no doctor but I’ve dealt with my own back problems and helped others over the years by following some of these basic rules.

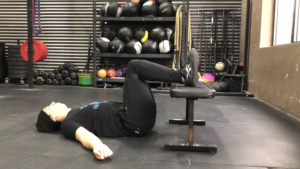
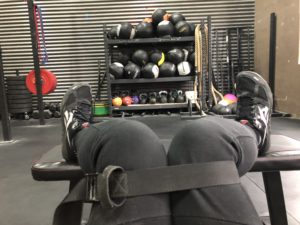
First thing is relax. Usually when you’re in a state of pain, you stress out. Once you’re stressed it heightens the pain. Lay down on your back, bend your knees to 90 degrees, and elevate your feet on a chair or couch so that your thighs are perpendicular to the floor and your shins are parallel to the floor. I also recommend internally rotating your thighs by keeping your knees close together and your feet apart. I sometimes use a strap to gently tie my knees together and use the back of the couch or chair to block my feet from coming together. Close your eyes and breathe deeply. Deep breathing through the nose using abdominal-thoracic breaths will help you stimulate your parasympathetic nervous system. This helps the body relax and helps quiet the pain response and helps muscles that are in spasm relax.

Three Abodes of Breath from Force Distance Time on Vimeo.

The next thing I recommend is to stay in motion. Sitting for long periods of time will cause your hip flexors to tighten and they can put a lot of stress on your lower back the moment you try to stand back up. Try to minimize the time you spend seated. When you do get up, try to move slowly at first, then try to walk around for as long as possible before you try to sit again.

The next thing I recommend is trying to increase blood flow and circulation to the area. The low budget approach to this is doing some cobra pushups. I recommend 3 sets of 15 or more reps with a 2-second pause at the top. They are simple. You lie prone on the floor with your hands next to your chest pressed into the floor like you are about to do a pushup. You squeeze your shoulders down and back, curl your chest up, squeeze your butt, then press your arms straight. Keep your butt squeezed and try to keep your hips close to the ground. The contractions of the glutes and lower back will warm the area and bring blood to the area.

Cobra Pushups from Force Distance Time on Vimeo.

If things are so bad that you cannot move without pain, then you need to find other ways to stimulate the muscles and create some blood flow. I like to use an electrical stimulation unit like a Powerdot or a Marc Pro that stimulates low level muscle contractions and helps create muscular activation without the pain that may be associate with moving. Once the muscles are stimulated and warm, you can then begin to move without pain. This is a good protocol if you have access to a muscle stimulator and can place the electrode pads on your back by yourself. You may require assistance and a small loan (worth it!) to purchase a stim unit.

Another way to stimulate blood flow to the area is through cupping or scraping. Cupping involves putting small cups on your back that have the air sucked out so it creates a vacuum. The vacuum draws the skin up and away from the superficial fascia and creates some bruising like a hickey. That bruising is what brings blood to the area. Scraping is another protocol (sometimes called gua sha or Graston) that uses an instrument (like a spoon or dull metal blade) to create soft tissue mobilization. Basically scraping the skin to create a sheer force between the skin and the superficial fascia. The result is again more blood flow and sometimes some bruising. The downside is that you will need someone to do these to you as most people cannot adequately perform these on their own lower backs.

Things to avoid are over stretching. Stretching has its place but is often over used. The problem with stretching is that it often feels good in the moment. Unfortunately, once the moment has passed, the pain often returns and is worse. This is especially true for certain disc injuries. So consider doing some stretches and exercises where you focus on keeping your spine in a neutral position and only move about the hip and shoulder.

Try these hip hinges and isolated hip circles to improve mobility without aggravating your spine.

Hip Hinges from Force Distance Time on Vimeo.

Isolated Hip Rotations from Force Distance Time on Vimeo.

Injuries Suck

Injuries suck. However, the sad truth is that we all get injured eventually. Whether it’s something you could have seen coming like an overuse injury or something totally unpredictable like a slip and fall, you have to understand that injuries will happen eventually. The best thing is to have a plan B and try your best to make the most of a bad situation.

I slipped and fell down the stairs last night and twisted my knee up pretty bad. There’s no telling how long my knee will be out of commission. However, I know in the gym I can work a lot on my upper body strength while my knee recovers. With respect to jiu-jitsu, it is obviously a lot harder to roll with a bad knee but certain drills and moves are still available to me.

The point is that it would be easy to be disheartened by this setback, but I see it as an opportunity for growth and development. The goal is to not lose too much ground or even to improve on some areas while the knee is off-line. When the knee comes back online, I should be as good or better than I am right now.

Gua Sha

You’ve probably seen some videos of people scraping themselves with large chrome axe heads.  Well this is an ancient Chinese technique call Gua Sha but nowadays most people know it as Graston.  The technique involves using an edged tool to scrape the skin and break up adhesions in the fascia under the skin.  While it might be nice to have a fancy, expensive tool to do this, all you need is a butter knife or a Chinese soup spoon and some lotion.

I love love love this technique for working on my forearms and hands after hard training sessions.  This is great for both CrossFit and Jiu-Jitsu.  Although bruising is common it’s not mandatory.  You do not have to leave big bruises in order to get results.  As you get more familiar with the technique, you will be able to gauge the proper depth and pressure better.

As you scrape, you will probably hear some sounds like you’re popping bubble wrap.  That’s the adhesions in the fascia breaking up.  Keep at it and you’ll hear the noise start to quiet.  Use lotion so you don’t irritate the skin.

Gua Sha a/k/a Graston from Force Distance Time on Vimeo.

Assisted Recovery: Wrists and Forearms

As soon as your training session is over, your body has to start repairing itself for the next session. Your body is naturally designed to recover and repair on its own with a little help from food, sleep and movement. If all you did was ate well, slept well and moved well, your body would naturally recover and repair itself in its own time. However, that process can be a little slow and, let’s be honest, we don’t eat, sleep and move optimally all day every day. I want to show you some things to assist our body’s natural recovery efforts that go beyond eating and sleeping.

When we start to train every day our body can’t keep up and keep repairing itself at such a rapid rate and that is when we start to see sign of overtraining such as:

– Decreased strength and performance
– Persistent muscle soreness
– Elevated resting heart rate
– Increased susceptibility to infections
– Increased incidence of injuries
– Irritability
– Depression
– Loss of motivation
– Insomnia
– Decreased appetite
– Weight loss
– Persistent fatigue
– High cortisol levels

So the obvious answer might be to train a little less. But, let’s be honest, we do not want to hear that. How do some people manage to train multiple times a day, 7 days a week? There is a old adage amongst trainers, “There is no such thing as over training, just under recovery.”

The more we increase our training, the more we must focus on our recovery. I purposely use the term “assisted recovery” to distinguish it from “active recovery”–a term many are already familiar with. Most people think of active recovery as a rest day where they go out and still workout but at a lesser intensity: a long run, a yoga class or playing a sport. Active recovery can be great and effective except sometimes doing more exercise does not send the proper signal to your nervous system that it is now time for recovery mode (i.e. your nervous system stays in fight or flight mode also known as sympathetic nervous system) . When I say assisted recovery I mean that we should aid in the down-regulation of the nervous system and facilitate the recovery process (also known as the parasympathetic nervous system) so that we can train hard again.

One of the most neglected areas on our body is our hands and forearms. We use our hands for everything on and off the mat, yet we seldom take any time to give the muscles (and other soft tissues) any help in recovery. Doing some self-massage with the Yoga Tune Up® balls will help fight inflammation, help lymphatic drainage, speed the recovery process, reduce pain and reduce soreness and fatigue. Additionally, because we store a lot of tension in the hands and forearms, you will see greater shoulder mobility after doing these exercises. Get a pair of Yoga Tune Up® balls and try the following moves after your next training session.

Check In / Check Out
Before beginning check your shoulder mobility. This is a baseline to just see where you shoulders are before we begin to roll out the hands and forearms. You can also take note of how “tight” your shoulders, wrists or forearms feel before beginning. This is a classic yoga move called Gomukhasana and it is great for illustrating shoulder mobility and imbalances from side to side. Use a belt if your shoulders are tight. Try both sides and do not stretch just take about 10 seconds to adjust and see how closely you can get your hands together. The point is to just see how far you can go without stretching specifically to get into this shape. After each of the exercises below, check back in with this move to see if there is any improvement in shoulder mobility. In fact, I recommend checking in after you do your right hand but before you do your left hand. You can feel the improvements as you go and notice the immediate differences on each side of your body as you do each exercise.

Why is this particular pose important? The pose is a great diagnostic for the amount of usable shoulder mobility you possess: flexion plus external rotation in the upper arm and extension plus internal rotation in the lower arm. If someone is missing range of motion the body will find lots of compensatory mechanisms to cheat when it can.  But for practical jiujitsu purposes: we can see how soon you will tap to americanas and kimuras. The less range you have the quicker the submission will cause you to tap. If you have more mobility you buy yourself some time to tap before damage occurs. Also you have more wiggle room to escape.

Gomukhasana Arms for Shoulder Mobility from Force Distance Time on Vimeo.

Hand Rollout
I call this particular move “The Childproof Lid” because it reminds me of opening a bottle of pills from the drugstore. Press down hard and turn. The fact that the balls are grippy, they will catch your skin and create a lot of shear force which will break up adhesions in the fascia. It will make your hand feel really warm and increase the circulation in your hand. In addition to that technique, try to really smash the ball and roll the whole surface of the palm like you’re making a bread. Do about 2 to 3 minute on each hand and make sure to try the gomukhasana arms in between sides to see if there is any change in your mobility. Also notice how much better your hands feel after doing this.

Day 3 of 30. The Childproof Lid from Force Distance Time on Vimeo.

Forearm Rollout
The main muscles that control your fingers and your grip are actually in your forearms and pull on the fingers with long tendons that extend down to the finger tips. Therefore, when you use your grip, your forearms get smoked. Additionally, the different muscles in your body should slide against each other like silk sheets, but when they get inflamed and neglected, they start to roughen up like corduroy and eventually turn to velcro. If you don’t do anything about it, it starts to rob you of grip strength because now when a muscle fires it doesn’t just pull the finger it has to pull all the other muscles it is stuck to. There are lots of ways to roll out these muscles. First, put your balls on the table and roll them out by simply pressing your forearm down and moving back and forth. Second, take your balls to the wall and lean your weight into them and make tiny movements with your hands and wrists.

Day 20 of 30. Put Your Balls On The Table. from Force Distance Time on Vimeo.

The Tiny Conductor from Force Distance Time on Vimeo.

Deep Finger Stretching
I learned these finger stretches from a colleague of mine and I had never seen them before. I’m guessing you haven’t seen them before either. They are good and deep and will help your hands a lot. Go slow with these because they are really intense.

Intense Finger Stretches from Force Distance Time on Vimeo.
See my other blog post on how to prepare your wrists before class and add these assisted recovery techniques after class. Do this work once or twice a week and over time you will have strong, healthy hands and be able to train harder.

Joint Preparation: Wrists and Forearms

Joint Preparation is strengthening the connective tissues around the joints: the tendons and ligaments. This is different than strengthening the muscles. Muscle tissues regenerate in about 90 days, connective tissue takes closer to 210 days to regenerate. Connective tissue has one-tenth the metabolic rate of muscle that means it takes 10 times longer to heal when it’s injured. The reason I prioritize joint preparation is because Brazilian Jiu-Jitsu (BJJ), by its nature, is based on causing trauma to the joints (armlocks, leglocks and neck cranks), therefore, strengthening connective tissue is a priority if one is to have longevity in the sport. Since it takes a really long time to regenerate connective tissue you need to prepare your joints consistently over a long period of time.

If you look at sports injuries in general, they tend to occur at end range of the joint where the muscles, tendons and ligaments are stretched to their fullest and are therefore their weakest. So joint preparation is basically end range strengthening and conditioning. This can look like weighted stretching or may take the form of various exercises that move the joints through full ranges of motion. By gradually loading the tissues at end range we can condition them to be stronger and more resilient in those positions.

In this article, I will take you through some of my favorite things to do to condition my wrists and forearms. Doing these will help your wrists stay strong and healthy over the years of doing BJJ.

Forearm Blast
This series of exercises will warm up your hands and forearms better than any other exercise I have ever done. There are five exercises that I show on this video. You begin with your arms straight out in front of you and you extend your wrists like you are pushing against a heavy door. Stretch you fingers as long and wide as you can and then make a tight fist while keeping your wrist bent back. Repeat this as fast as you can while trying to extend and flex your fingers as much as you can. Go as long as you can manage. You want to work towards being able to go for a minute. Then repeat this with your wrist flexed and your fingers pointing down at the floor. Now it gets more interesting, bend your elbows 90 degrees like you are a T-Rex and repeat the two variations (fingers up and fingers down). Lastly, with your elbows bent quickly flip your hands over, palms up and palms down, as fast as you can. This works the supination and pronation of the forearm. This whole sequence should take you less than 5 minutes. At first your forearms will feel swollen and tight like Popeye, but then after a minute the hands and wrists will feel really warm and loose. You are probably wondering if the burning sensation in your forearms is normal and healthy. Yeah, kind of. You have many muscles in your forearms that are encased in fascia and all those muscles should be able to slide and glide against each other and move independently. When we do these exercises we become aware that we do not have as much slide and glide as we should. The friction between these surfaces causes a lot of heat. Doing the joint preparation and assisted recovery (my next blog post) will help and you will soon notice that you can go longer and longer with this exercise.

Forearm Blast from Force Distance Time on Vimeo.

Wrist Stretches
Now that you are warmed up, we can stretch the wrists a little. These stretches are good to help increase some range of motion and also to start loading the joints with a little bit of weight. The four stretches I show on video can all be done from the knees and do not take very long. I recommend doing 10 gentle pulses into each stretch and then holding the last rep for 30 seconds.

Forearm Blast: Part 2 from Force Distance Time on Vimeo.

Wrist Push-Ups
These wrist push-ups are extremely challenging, but they will build very strong wrists that can withstand a lot of abuse. I recommend starting these standing up against the wall and only doing 1 hand at a time initially (The other hand was just doing a regular pushup. Don’t try to do 1-arm wrist pushups, you fucking savage!). That is how I learned them. Eventually, I was able to do them with both hands simultaneously standing at the wall, then I started doing them from my knees on the floor with one hand and then eventually with both hands. I was at the point where I could do them from my toes, but then I hurt my wrist and had to start back from square one. Even though these exercises didn’t prevent me from getting injured, by scaling back to very light versions of these, I was able to get my wrist back to 100% in a very short period of time. Work up to 5 sets of 5 of each variation. Start with the standing variations first before going to your knees. Also do not be in a hurry. These exercises are for the connective tissues that take a long time to regenerate. You will not see huge wrist muscles all of a sudden. You have to be patient and even if you think the variation is too easy, make sure you can do 5 sets of 5 with perfect form before trying to advance. Even if you stayed at the easiest variation and did them once a week for a year, in a year you wrists would be much stronger and healthier.

Forearm Blast: Part 3 from Force Distance Time on Vimeo.

Foam Rolling Isn’t Really Myofascial Release

A client just sent me this video and asked me what I thought.  I am supposed to be a mobility guy and I talk about rolling and doing myofascial release and this videos says that’s BS!  Or does it?

First, watch the video.  It’s an excellent primer on fascia which is the scaffolding of the body.  Fascia is the soft tissue that we try to manipulate when we do mobility work.  When we say we are stretching muscles what we are really talking about is changing the length and tension of the fascial tissues.  The muscle tissue lives inside the fascia and doesn’t really stretch.  The knots or adhesions that we poke and rub are in the fascia not the muscle.  So fascia is really what most people mean when they say “I need to stretch this muscle” or “I have a knot in this muscle.”

Second, as to the claim that rolling or instrument assisted soft tissue manipulation (‘IASTM’) is not myofascial release. He is being too simplistic or perhaps making a broad claim for a bit of shock value to get people to click.  But if you listen to the actual explanations he states that deep pressure and rolling over the skin with a roller or instrument does not cause relative movement between the tissue layers (which I call ‘Shear’ or you can think of as ‘slide and glide’) and is therefore not myofascial release.  Yes and no.  It is true that a traditional foam roller works like that and does not create shear force.  The same is true for some IASTM tools like theracanes or Graston.

One of the reasons I love Yoga Tune Up® therapy balls and recommend all my clients use them instead of foam rollers and lacrosse balls is because they are designed to be grippy and catch the skin and to help create a lot of shear force and create a truer myofascial release than with a foam roller. In the Yoga Tune Up lexicon there a couple of techniques that we use to create more shear force:  Pin & Stretch and Pin, Spin & Mobilize.

In the first two videos below, I use two different Yoga Tune Up balls to create a pin & spin shear on my bicep and on my belly respectively.  Using the ball to spin and catch all the skin and pull it across the fascial layers underneath just like Dr. Spina demonstrates in his video.

In the third video, I use a pin & stretch technique on my quad by tacking down the skin with the Alpha ball and moving the knee joint  creates shear as the muscle lengthens and shortens under the ball and relative to the skin that is pinned down.

So if you really want to create a true myofascial release, you need the right tools and the right techniques.  Get some Yoga Tune Up® balls and play along with my videos and give your foam roller away as a gift.

Day 22 of 30. Gun Maintenance. from Force Distance Time on Vimeo.

Day 15 of 30. The Twister. from Force Distance Time on Vimeo.

Day 10 of 30. The Quadzilla from Force Distance Time on Vimeo.

It’s All Connected

When someone has a “mobility issue” it is often tied to other “issues.” For example, someone has an injury or experiences some pain in a position and the body compensates (consciously or subconsciously) to restrict movement around that position. There is a shoulder impingement that causes pain when the shoulder goes into flexion thus the body decides that movement is now off the table. Eventually these short term solutions to pain become long term restrictions.

Another side effect is that when a person decides that they need to use that range of motion for survival or sport, the body will find numerous ways to “work around” the issue. Instead of lifting the arm overhead into shoulder flexion the body will now compensate by bending backwards and creating undue hyperextension of the lumbar spine: a creative short term solution with bad long term repercussions.

This is all just to say that when dealing with “mobility issues” you have to address pain management issues as well as movement re-education issues. Unfortunately most people think like shoe salesmen, they see you run and then prescribe a shoe that will supposedly fix your feet. It doesn’t work that way.

Day 30 – What’s A Nice Ball Like You Doing In A Place Like This?

Pelvic floor dysfunction is a big problem. Often associated with urinary and bowel problems but a hypertonic pelvic floor can affect many more things like cystitis or vulvadynia. Chronic shortening of the pelvic floor muscles, either due to Kegel overtraining, poor postural habits or trauma can lead to an increase in pelvic floor tightness.

Massaging the pelvic floor is easy. You take a padded seat and a well-used Yoga Tune Up® ball and sit on it. The ball should rest between the two sitting bones behind the genitals and in front of the anus. Gently move your pelvis through anterior and posterior tilts as well as right and left elevation and depression. The YTU ball should gently roll between between the sitting bones and from front to back. This will feel weird but it’s so necessary for a healthy pelvis.

The rules for the Ball Fucking Harder Challenge are easy. First, I recommend getting some Yoga Tune Up® balls to roll on. All you have to do is post a pic or video of yourself doing the technique and tag me (@coachpanda). Use the hashtags #ballfuckingharder #30daypandachallenge #supplepandas #pandiculation. The challenge is even better when you share it with friends so tag your friends to play along.

Day 30 of 30. What's A Nice Ball Like You Doing In A Place Like This? from Force Distance Time on Vimeo.

Day 29 – The Neck Spear.

The Bermuda Triangle of the body is that area behind the clavicle and in front of the trapezius. When I apply downward pressure into that gully I want to throw up. The pressure against the scalenes is horrific but extremely necessary. Because my head sits forward of my midline, the weight of my head is amplified and puts a large strain on my neck and upper back muscles and impedes my shoulder mechanics. In addition to trying to improve my posture, I spend a lot of time hunting around for areas of tension and trying to release them. The Neck Spear is my secret weapon.

With a superball taped to the end of a PVC pipe I can get very precise pressure into the scalenes and down onto the first rib. Doing this frees up movement in my neck, shoulder, scapula, clavicle and ribs. It is basically a reset button for my upper extremities. Press down and lightly shrug your shoulders and turn your head from side to side. Beware of too much nerve pressure. Go slowly and cautiously. Spend several minutes exploring the Bermuda Triangle and then retest your shoulder movements. You should have noticeable improvement.

The rules for the Ball Fucking Harder Challenge are easy. First, I recommend getting some Yoga Tune Up® balls to roll on. All you have to do is post a pic or video of yourself doing the technique and tag me (@coachpanda). Use the hashtags #ballfuckingharder #30daypandachallenge #supplepandas #pandiculation. The challenge is even better when you share it with friends so tag your friends to play along.

Day 29 of 30. The Neck Spear. from Force Distance Time on Vimeo.

Day 28 – Calm Your Pits!

The Subscapularis is a hidden gem of a muscle. It lives in the back of your armpit against the anterior surface of the scapula. Its job is to internally rotate your shoulder but in the process it gets really tight and restricts our movement. By massaging it we reclaim a lot of mobility in the shoulder, however it lives in a dark cave and does not want to be found. In order to get it, we either need a skilled friend or a long stick with a ball taped to the end of it.

Take your wizard staff and trace the rib cage around to the back of the armpit. Let the arm drape towards the floor so you can allow the scapula to slide off the back and expose the anterior surface to the ball. With some gentle internal and external rotation of the shoulder you can locate the subscapularis as it contracts and relaxes against the pressure of the ball. Check in and check out with your overhead position and notice how much new range you have.

The rules for the Ball Fucking Harder Challenge are easy. First, I recommend getting some Yoga Tune Up® balls to roll on. All you have to do is post a pic or video of yourself doing the technique and tag me (@coachpanda). Use the hashtags #ballfuckingharder #30daypandachallenge #supplepandas #pandiculation. The challenge is even better when you share it with friends so tag your friends to play along.

Day 28 of 30. Calm Your Pits! from Force Distance Time on Vimeo.